- the purpose of this howto
- this howto is part one of a two-part howto in which we will create two types of forms in React
- (1) a simple form with FormData
- (2) a complex form with state variables
- this howto is part one of a two-part howto in which we will create two types of forms in React
- what we will build
- this site will run as a local React application in which you can add data to a database (a JSON file) via forms
- when you publish the site to Vercel, the pages which contain the forms will not be displayed
- only the pages that display data will be displayed
- this is a practical and safe way to create a content management system for an online website
- so in the process of completing these two howtos, you will
- build a simple content management system for yourself or others
- learn the difference between two kinds of forms you can build
- (1) an HTML form with FormData
- simple and practical
- this technique is also being used today in Next.js server-only forms
- (2) a custom, feature-rich, client-side solution with state variables for more complex, interactive forms
- (1) an HTML form with FormData
- in this howto we will build the first kind of form
- there are many other tools and concepts will use to build this application such as
- json-server to store our data
- environment variables to determine if the app is in development or production mode
- we use Postman briefly to test the json-server API
- basic React Router to have multiple pages
- how to create an npm run dev script that starts two applications listening on two ports
- (1) a Vite React site
- (2) a json-server API
- GitHub repository:
- live site:
- site will work like this:
- you add data to your JSON file locally with user-friendly forms
- when you publish online, your site is read-only
- most important concepts, skills and tools
- concepts
- what are the two main different ways to create custom forms in React
- use FormData which automatically collects data from fields based on their name attribute
- the FormData API became a W3C Recommendation in 2015
- today it is supported by all major browsers
- use this if you do not need instant validation or if the standard HTML form validation is sufficient
- with an object state variable which has a property for each field which is itself an object
- this is a bit more work in setting up
- but it allows you to create custom, complex live validation
- e.g. you could query an API and appropriately respond based on what the user is typing in a field
- this method allows you to control every aspect of the user experience while using a form
- why don't you need to set up state variables for each field when using FormData?
- because FormData automatically reads the values of the form fields based on their name attribute
- what do environment variables do?
- these variables are outside of your website and store configuration settings for a particularly environemnt, usually for development, testing and production
- an example might be
- in Vite sites and Node backends, you save environment variables in an .env file
- at Vercel, you can enter environment variables for a specific site
- what do you have to do after you change an environment variable locally
- restart your application with
npm run dev
- restart your application with
- what do you have to do after you change an environment variable at a provide like Vercel
- redeploy the site
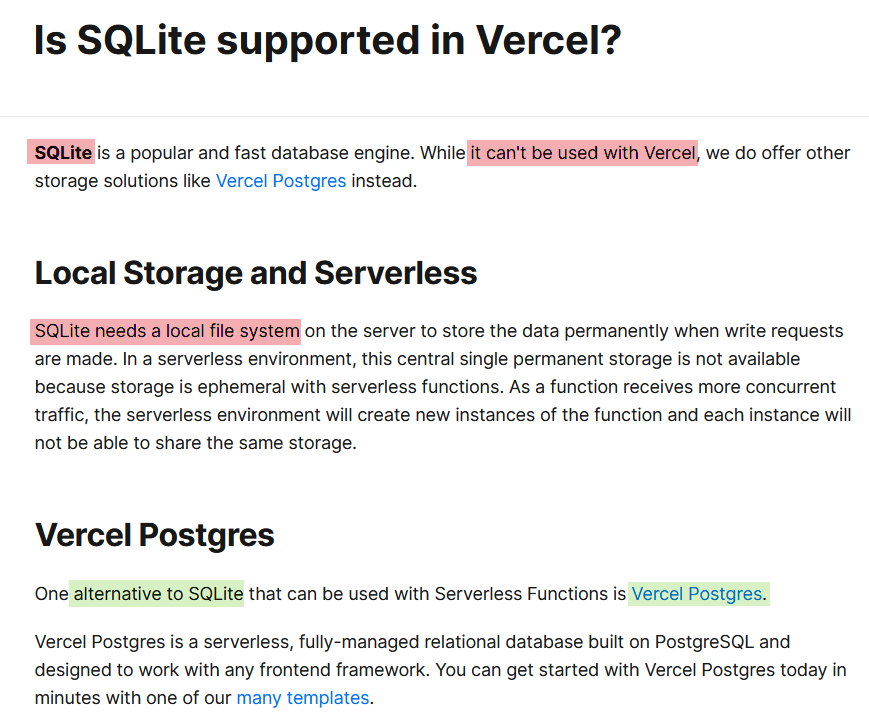
- why is it that we can use json-server locally in this app, but not at Vercel
- because of the fact that Vercel does not have a backend in the sense that your local machine has a backend
- Vercel does not have a file-system
- it does have a backend cloud-function area where you can fetch data from an online database or API and send it to the browser, e.g. using Next.js
- understanding this is key to understanding the direction React is moving with the SSR and SSG trends
- understanding this is key to understanding the direction React is moving with the SSR and SSG trends
- what are the two main different ways to create custom forms in React
- skills
- how do you read an environment variable in Vite
- put it in an .env file as e.g.
VITE_ENVIRONMENT = development - then read it out in your Vite app with
const environment = import.meta.env.VITE_ENVIRONMENT;
- put it in an .env file as e.g.
- how to you set up a site so that with "npm run dev" you start the frontend Vite site and the "backend" json-server?
- install npm-run-all
- set up npm scripts in package.json e.g.
- "dev": "run-p api frontend","api": "json-server --watch ./src/data/db.json --port 4801","frontend": "vite --port 4800 --open",
- how do you read an environment variable in Vite
- tools
- FormData
- preventDefault()
- json-server
- .env file
- import.meta.env
- concepts
- >>> 1. set up React site with menu in order to have a form on each page
- go to: ../vite-react-menu-createbrowserrouterhttps://github.com/edwardtanguay/vite-react-menu-createbrowserrouter
- use template to create new repostory on your GitHub, e.g.
et711-react-forms-site(use your own name so you can publish it one-to-one at Vercel) - clone it locally
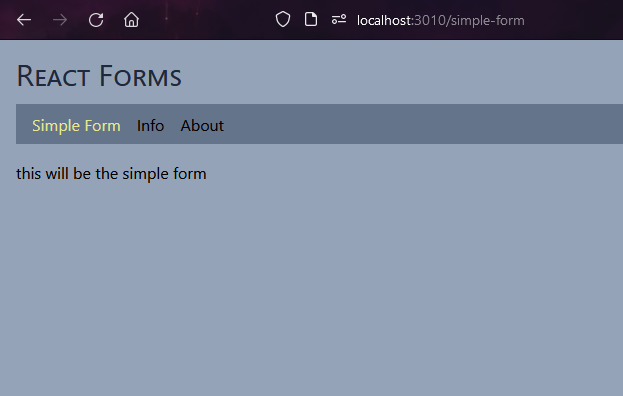
npm inpm run dev- site should look like this:
- >>> 2. customize site for simple page
- change title of site to React Forms
- index.html
- <title>React Forms</title>
- Header.tsx
- <h1 className="text-3xl mb-3 text-slate-800">React Forms</h1>
- index.html
- change Welcome page to Simple Form
- change PageWelcome.tsx to PageSimpleForm.tsx
- export const PageSimpleForm = () => {return (<p>this will be the simple form</p>);};
- Nav.tsx
- <li><NavLink to="/simple-form">Simple Form</NavLink></li>
- main.tsx
- {path: "/simple-form",element: <PageSimpleForm />,},{path: "/",element: <Navigate to="/simple-form" replace />,},
- change PageWelcome.tsx to PageSimpleForm.tsx
- site should look like this:
- change title of site to React Forms
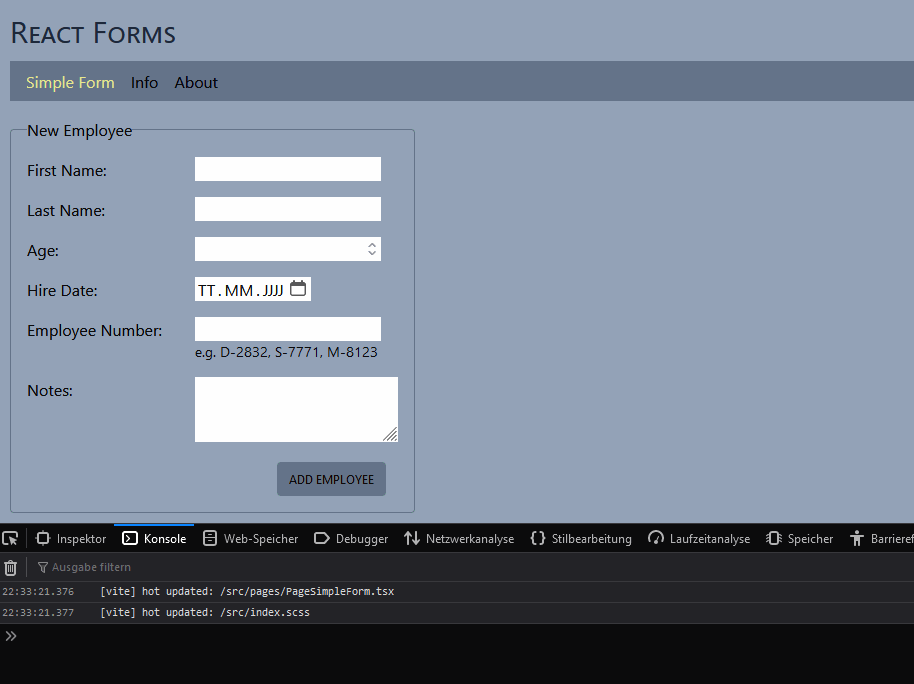
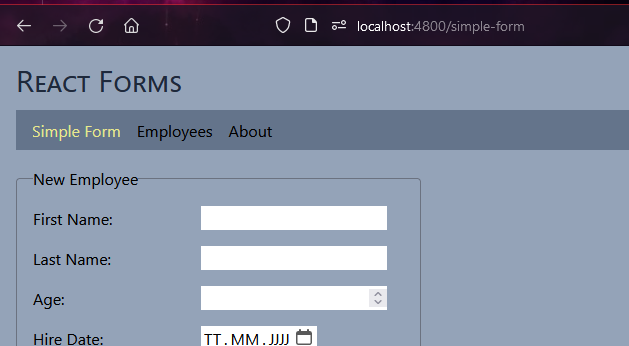
- >>> 3. set up simple form to collect and display data
- PageSimpleForm.tsx
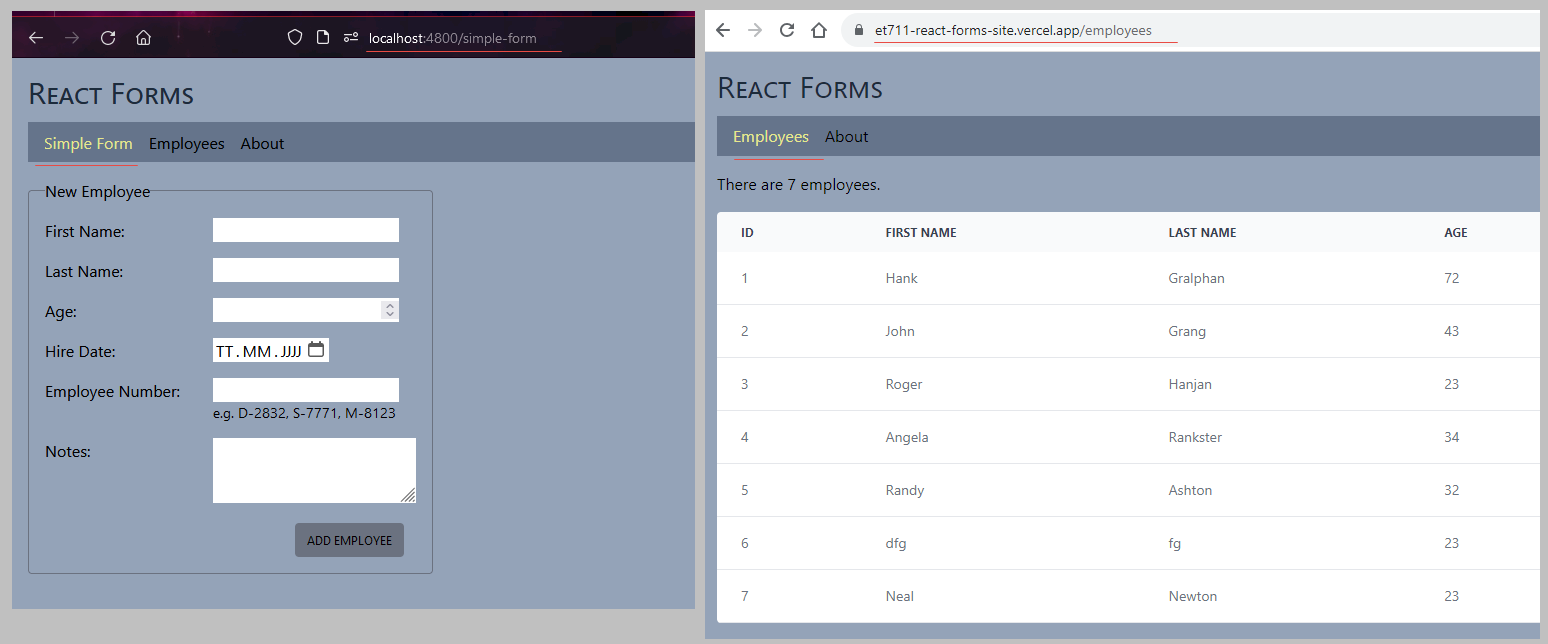
- import { FormEvent } from "react";export const PageSimpleForm = () => {const handleFormSubmit = (event: FormEvent<HTMLFormElement>) => {event.preventDefault();const data = new FormData(event.target as HTMLFormElement);console.log(data);};return (<form onSubmit={handleFormSubmit}><fieldset className="border border-gray-500 p-4 w-full sm:w-40 rounded"><legend>New Employee</legend><div className="mb-4 flex gap-2"><label className="w-[10rem]" htmlFor="firstName">First Name:</label><inputtype="text"id="firstName"name="firstName"required/></div><div className="mb-4 flex gap-2"><label className="w-[10rem]" htmlFor="lastName">Last Name:</label><input type="text" id="lastName" name="lastName" required /></div><div className="mb-4 flex gap-2"><label className="w-[10rem]" htmlFor="age">Age:</label><input type="number" id="age" name="age" required /></div><div className="mb-4 flex gap-2"><label className="w-[10rem]" htmlFor="hireDate" >Hire Date:</label><input type="date" id="hireDate" name="hireDate" required /></div><div className="mb-4 flex gap-2"><label className="w-[10rem]" htmlFor="employeeNumber">Employee Number:</label><div><inputtype="text"id="employeeNumber"name="employeeNumber"pattern="^[DSM]-\d{4}$"required/><p className="text-sm">e.g. D-2832, S-7771, M-8123</p></div></div><div className="mb-4 flex gap-2"><label className="w-[10rem]" htmlFor="notes" >Notes:</label><textarea id="notes" name="notes"></textarea></div><div className="mt-5 flex justify-end pr-3"><button>Add Employee</button></div></fieldset></form>);};
- form works like this:
- PageSimpleForm.tsx
- >>> 4. set up json-server and save data to "backend" JSON file
- since our backend will simply be a json-server serving a json file named db.json
- we will not need to set up a Node/Express backend
- json-server will do all the work for us providing all the read/write API routes we need for the one collection in our db.json file:
- employees
- note: if you want to extend this application later to edit and delete employees, json-server offers all the routes to do that
- NOTE:
- locally we will be able to read/write to our JSON file
- at Vercel we will only be able to read our JSON file
- consider why this is the case
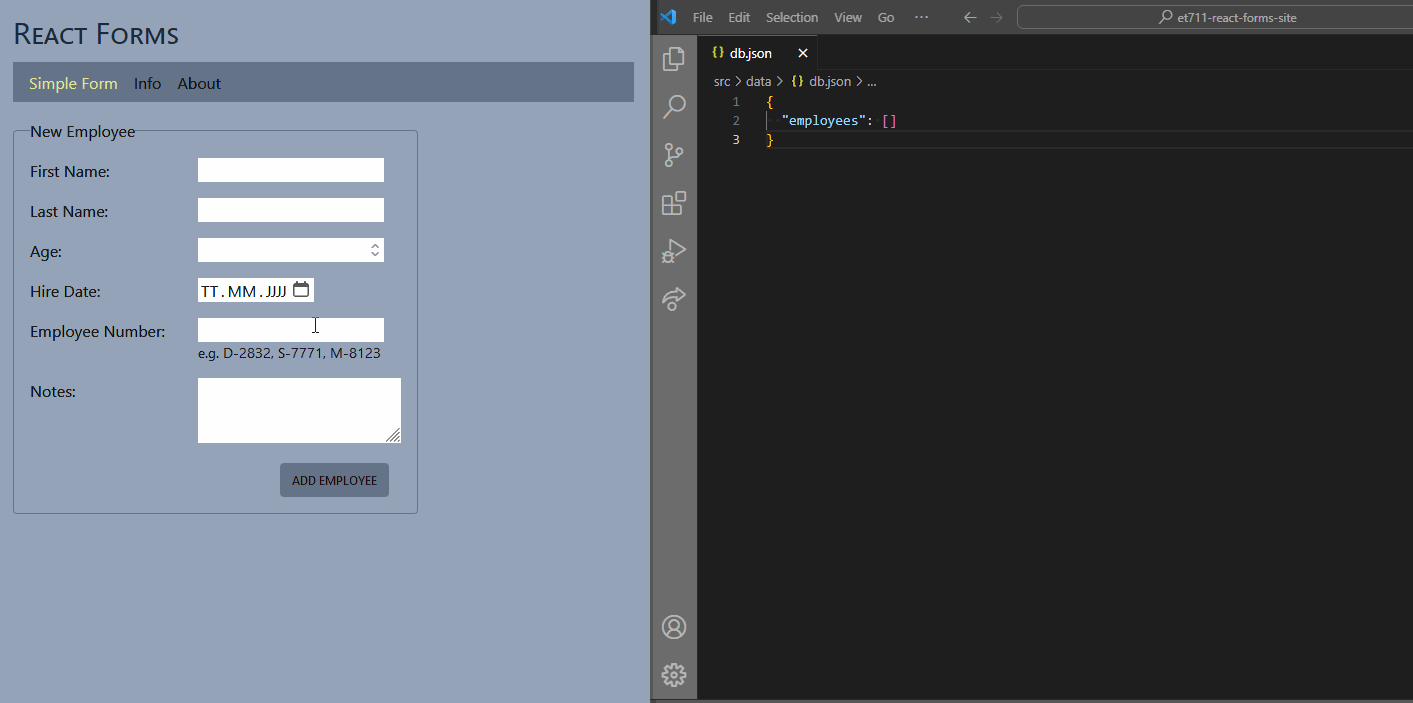
- src/data/db.json
- {"employees": []}
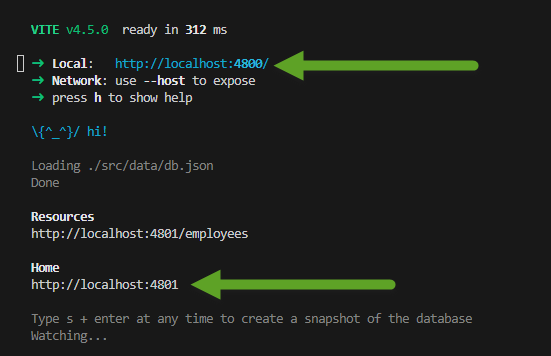
- set up backend and npm scripts
- install json-server which will serve our JSON file via a REST API
npm i -D json-server
- install npm-run-all in order to start both backend and frontend with npm run dev
npm i -D npm-run-all
- package.json
- "dev": "run-p api frontend","api": "json-server --watch ./src/data/db.json --port 4801","frontend": "vite --port 4800 --open",
- now type
npm run dev - your frontend and backend should start like it did before
- but now running on two ports, frontend and backend:
- but now running on two ports, frontend and backend:
- install json-server which will serve our JSON file via a REST API
- test if the backend is running
- test.rest
- @url = http://localhost:4801### GET ALL EMPLOYEES{{url}}/employees### ADD AN EMPLOYEEPOST {{url}}/employeescontent-type: application/json{"firstName": "James","lastName": "Tester","age": 55,"hireDate": "2020-01-01","employeeNumber": "D-8811"}
- clicking on the links should add and display employees in the db.json file
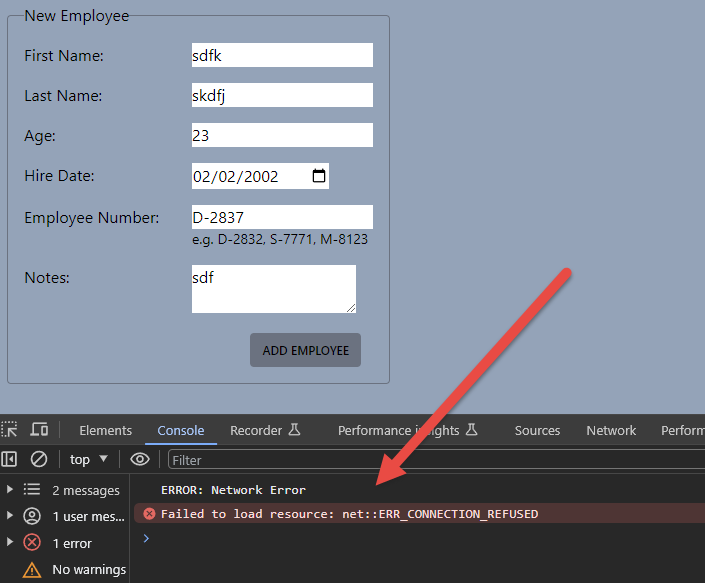
- I got an ECONNREFUSED error with the REST Client extension
- if test.rest doesn't work, use Postman
- test.rest
- since our backend will simply be a json-server serving a json file named db.json
- >>> 5. program form to save employee when button is clicked
- when the user clicks the submit button
- instead of just printed out the form data in the console
- we want to add it to our database
- to do that, we need to send a POST request to our json-server
- install axios
npm i axios
- PageSimpleForm.tsx
- import { FormEvent } from "react";import axios, { AxiosResponse } from "axios";import { useNavigate } from "react-router-dom";export const PageSimpleForm = () => {const navigate = useNavigate();const handleFormSubmit = (event: FormEvent<HTMLFormElement>) => {event.preventDefault();const formData = new FormData(event.target as HTMLFormElement);const employee = JSON.stringify(Object.fromEntries(formData));(async () => {const headers = {"Access-Control-Allow-Origin": "*","Content-Type": "application/json",};try {const response: AxiosResponse = await axios.post("http://localhost:4801/employees",employee,{ headers });if (response.status === 201) {navigate('/employees');} else {console.log(`ERROR: ${response.status}`);}} catch (error: any) {console.log(`ERROR: ${error.message}`);}})();};
- form will submit employees like this:
- when the user clicks the submit button
- >>> 6. display the employees on another page
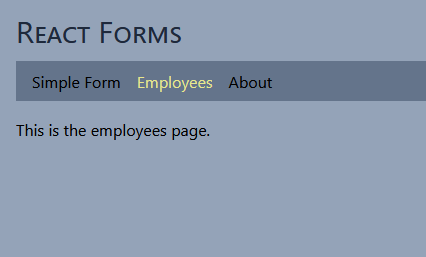
- change page Info to Employees
- PageEmployees.tsx
- export const PageEmployees = () => {return (<p>This is the employees page.</p>)}
- Nav.tsx
- <NavLink to="/employees">Employees</NavLink>
- main.tsx
- {path: "employees",element: <PageEmployees />,},
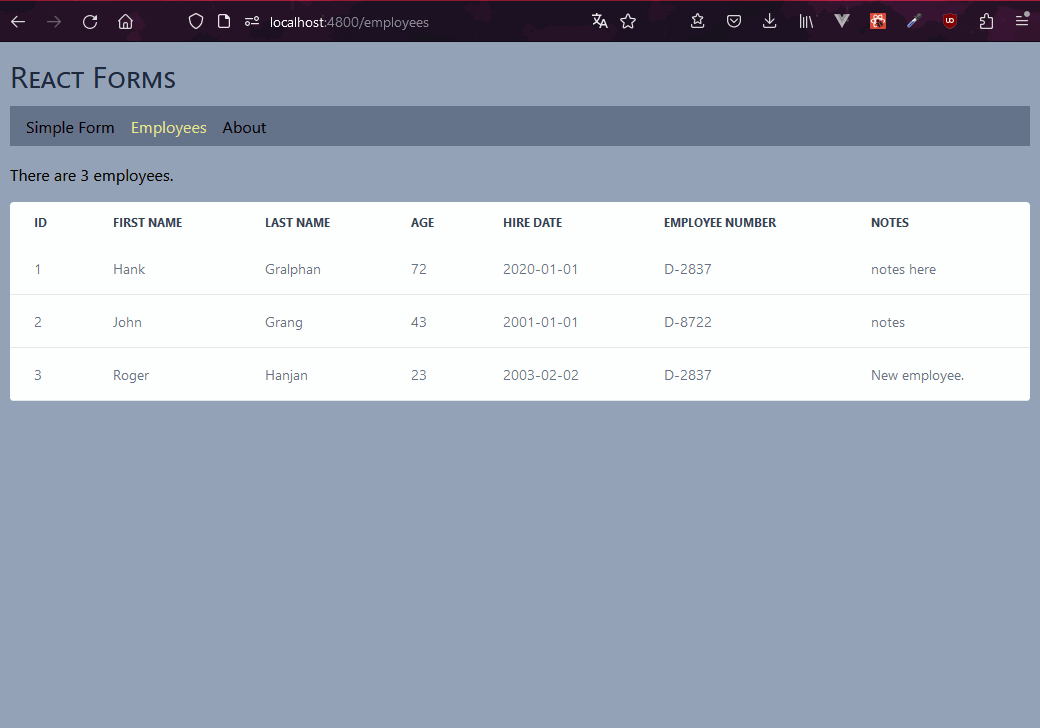
- employees page looks like this:
- PageEmployees.tsx
- display employees on page
- interfaces.ts
- export interface IEmployee {id: number;firstName: string;lastName: string;age: number;hireDate: string;employeeNumber: string;notes: string;}
- PageEmployees.tsx
- import { useState, useEffect } from "react";import { IEmployee } from "../interfaces";import axios from "axios";const url = "http://localhost:4801";export const PageEmployees = () => {const [employees, setEmployees] = useState<IEmployee[]>([]);useEffect(() => {(async () => {setEmployees((await axios.get(`${url}/employees`)).data);})();}, []);return (<>{employees.length === 0 ? (<p>Loading...</p>) : (<><p>There are {employees.length} employees.</p><div className="relative overflow-x-auto mt-4 rounded w-1/2"><table className="w-full text-sm text-left rtl:text-right text-gray-500 dark:text-gray-400"><thead className="text-xs text-gray-700 uppercase bg-gray-50 dark:bg-gray-700 dark:text-gray-400"><tr><th scope="col" className="px-6 py-3">ID</th><th scope="col" className="px-6 py-3">First Name</th><th scope="col" className="px-6 py-3">Last Name</th><th scope="col" className="px-6 py-3">Age</th><th scope="col" className="px-6 py-3">Hire Date</th><th scope="col" className="px-6 py-3">Employee Number</th><th scope="col" className="px-6 py-3">Notes</th></tr></thead><tbody>{employees.map((employee) => {return (<tr className="bg-white border-b dark:bg-gray-800 dark:border-gray-700"><td className="px-6 py-4">{employee.id}</td><td className="px-6 py-4">{employee.firstName}</td><td className="px-6 py-4">{employee.lastName}</td><td className="px-6 py-4">{employee.age}</td><td className="px-6 py-4">{employee.hireDate}</td><td className="px-6 py-4">{employee.employeeNumber}</td><td className="px-6 py-4">{employee.notes}</td></tr>);})}</tbody></table></div></>)}</>);};
- interfaces.ts
- added employees now appear on the employees page
- change page Info to Employees
- >>> 7. publish site to Vercel and make it read only
- make the employees page read from JSON instead of the backend
- go to ../vercel.comhttp://vercel.com and publish your site
- when you go to it, the site seems to work
- it seems that you are able to add employees and they appear on our online page
- Q: what is happening?
- A: you are using your online frontend but your local backend
- to see that this is true, shut your local backend down and see that you can no longer read or write employees on your online site
- it seems that you are able to add employees and they appear on our online page
- we want to be able to edit with forms locally
- yet have the site display data on the online site
- so let's change the source of the employees on the PageEmployees page to an import of the JSON file instead of an axios call to the backend
- PageEmployees.tsx
- import db from '../data/db.json';const employees = db.employees;
- push the site to your GitHub repository
- turn off your backend json-server
- visit your online page at Vercel
- you will be able to see the the employees on the employees page
- since they are now loading from the JSON file which has been turned into a JavaScript object on the Vercel site
- but you will not be able to add employees, since your local server is off:
- and if you turned on your backend server, then you could add employees from your online site into your local backend
- but we don't want to do this
- so we will now take the Simple Form page off the menu when the site is online
- you will be able to see the the employees on the employees page
- take the Simple Form page off the menu when the site is online
- to do this, we need to create an environment variable which will be we will save in an .env file
- if our app finds this variable, then it knows it is local
- if our app cannot find this variable, then it knows it is online at Vercel
- create .env in the root directory
- VITE_ENVIRONMENT = development
- so that you don't upload your .env file to GitHub, add it to your .gitignore file
- .env
- the .env file should now be the color gray just like node_modules
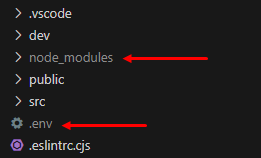
- this means that both will not be ignored by Git and not uploaded to GitHub
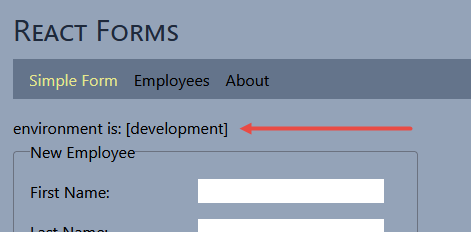
- now let's display the environment variable on the simple form page
- config.ts
- export const environment = import.meta.env.VITE_ENVIRONMENT;
- PageSimpleForm.tsx
- import * as config from "../config";<p>environment is: [{config.environment}]</p>
- it will look like this:
- config.ts
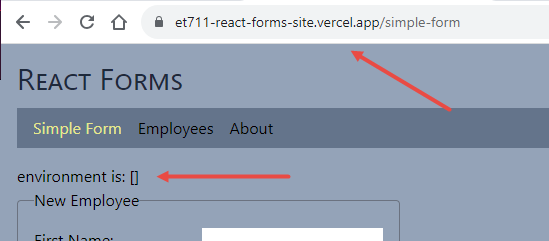
- now let's push it to GitHub and look at it on Vercel
- we see that it is empty since we have set any environment variable at Vercel
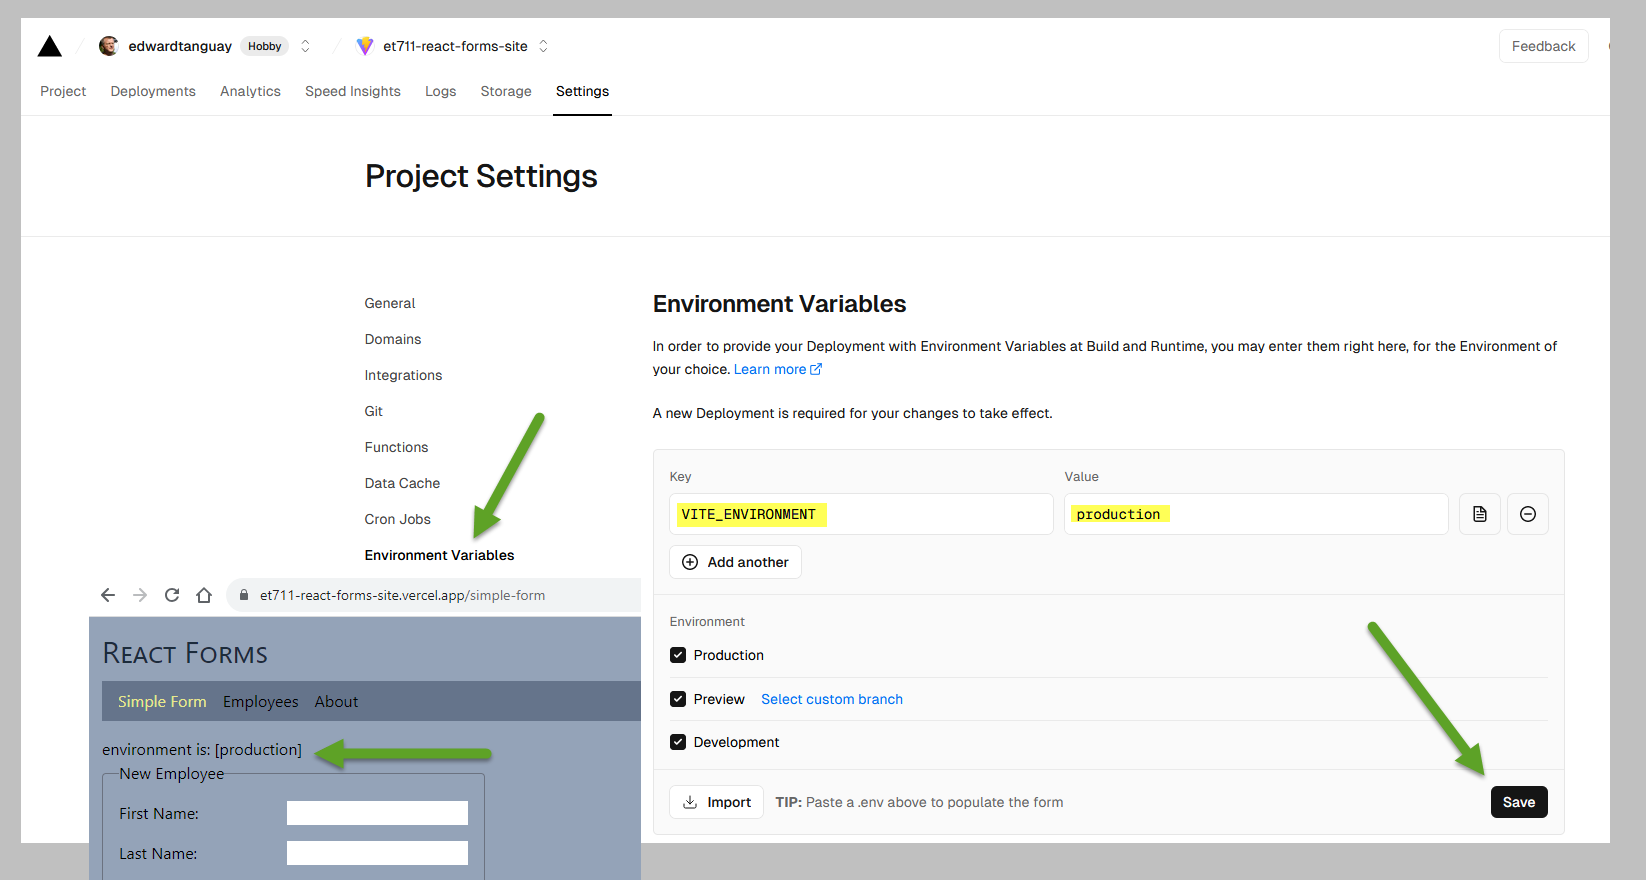
- note that in this case, we don't have to, but we could even add a value at Vercel that explicitly tells the application that it is in production
- let's do this for practice
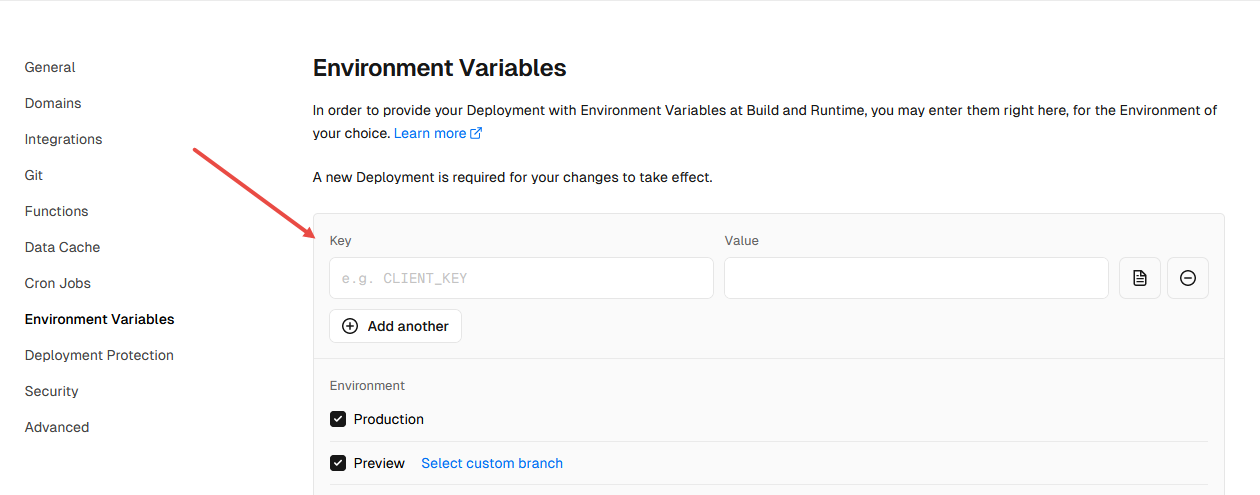
- after you change an environment variable, you have to redeploy the site
- at Vercel: click on Deployments, click the three dots, and Redeploy
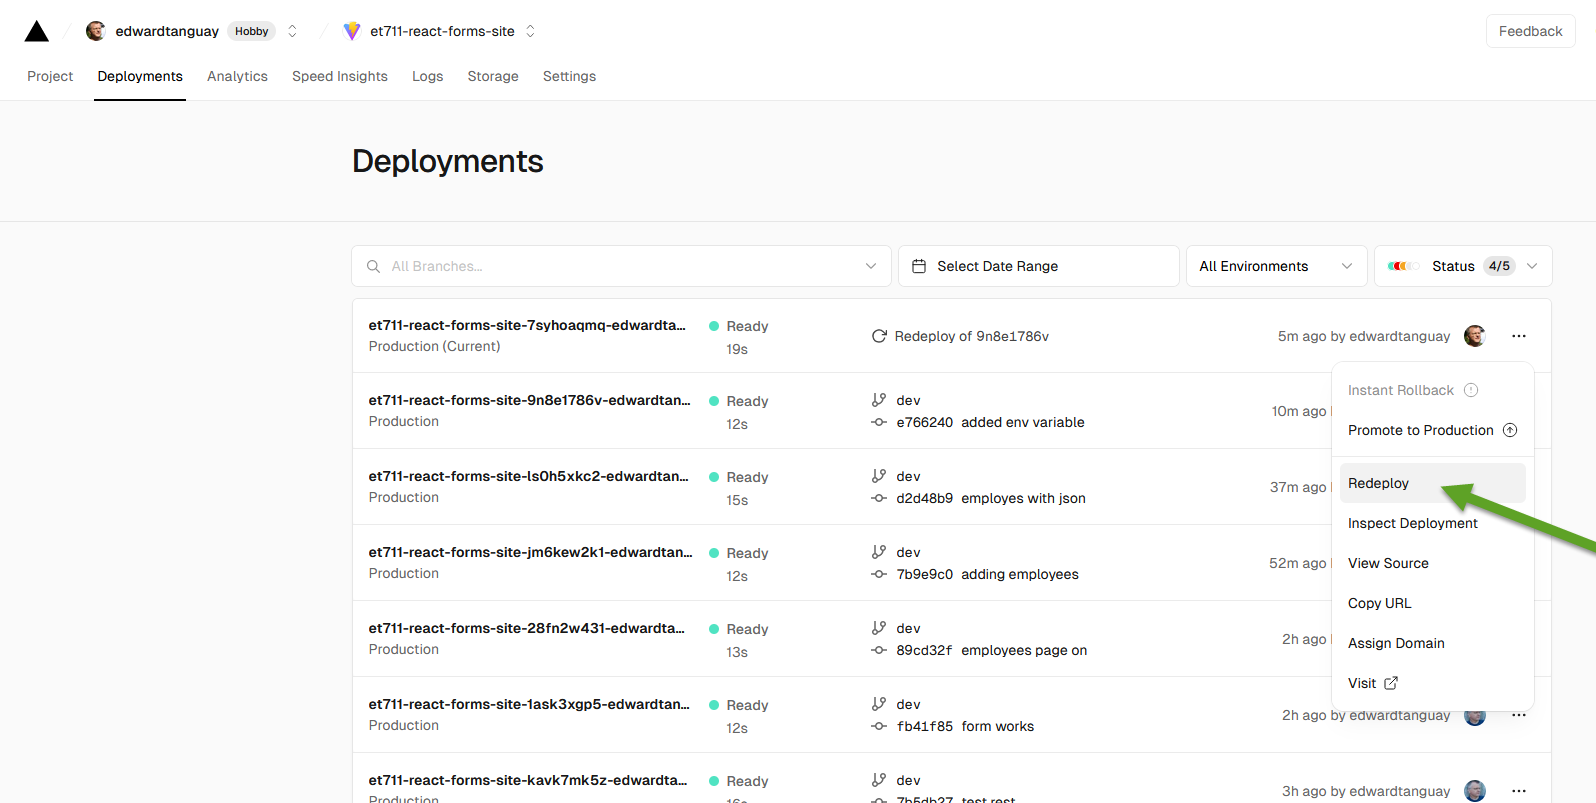
- at Vercel: click on Deployments, click the three dots, and Redeploy
- the environment variable at Vercel now shows up on the page:
- we see that it is empty since we have set any environment variable at Vercel
- to do this, we need to create an environment variable which will be we will save in an .env file
- now let's hide the simple form page when the site is at Vercel, since that page cannot be used anyway online
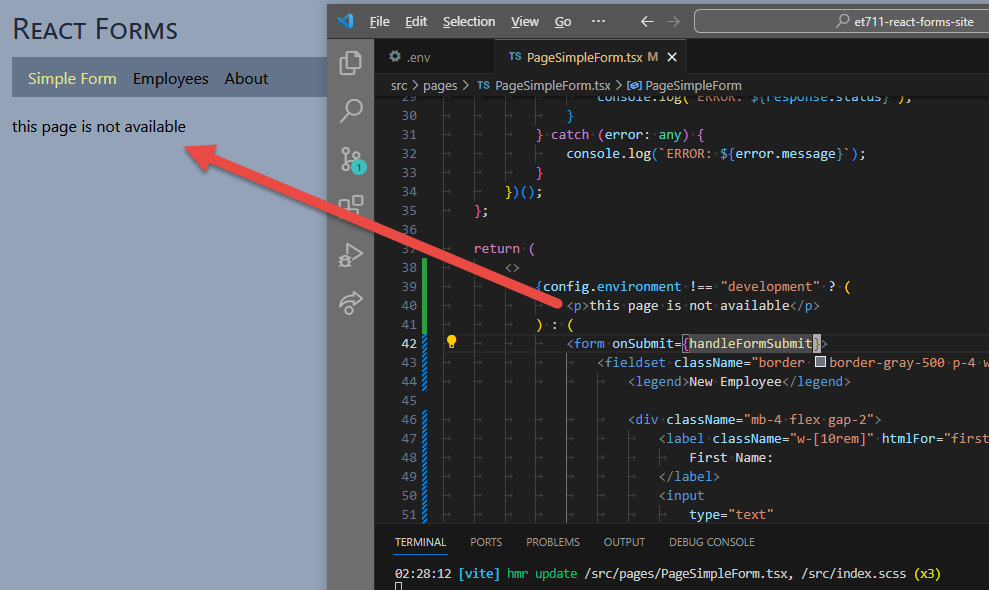
- to test locally, change the value in the .env file to something else because "development"
- VITE_ENVIRONMENT = nnn
- check the page:
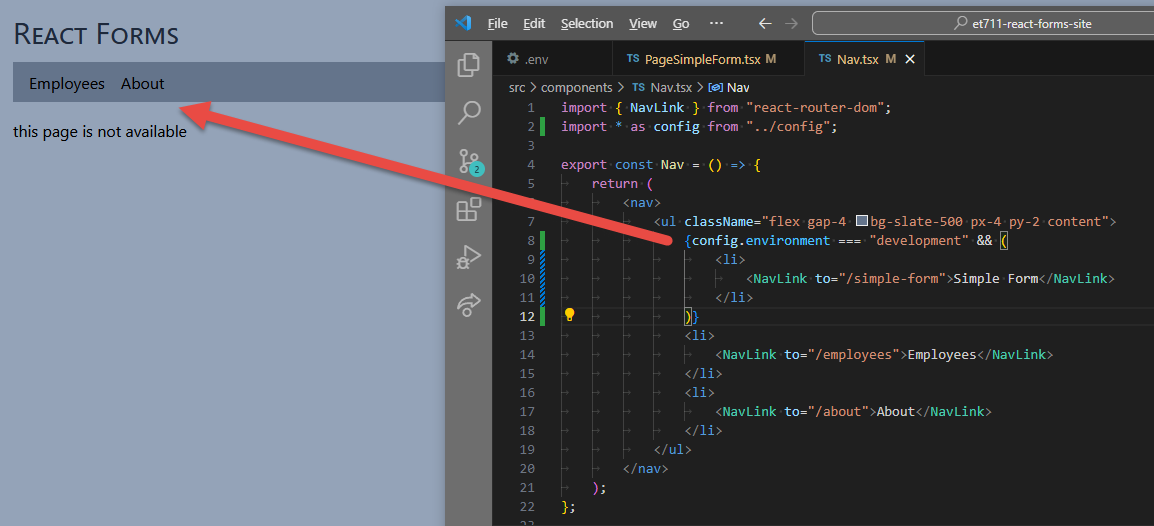
- also take the menu item out of the menu
- Nav.tsx
- {config.environment === "development" && (<li><NavLink to="/simple-form">Simple Form</NavLink></li>)}
- Nav.tsx
- now even the menu item is not available when the environment is not "development"
- switch variable back to "development"
- .env
- VITE_ENVIRONMENT = development
- .env
- be sure to restart the application (always after you change environment variables)
- we now see the page again:
- now push your changes to GitHub again and check your Vercel site
- when your site is online, you will not see the Simple Form page
- note that the default page is no longer correct, change it in main.tsx
- element: config.environment === 'development' ? <Navigate to="/simple-form" replace /> : <Navigate to="/employees" replace />,
- to test locally, change the value in the .env file to something else because "development"
- make the employees page read from JSON instead of the backend
- >>> 8. local data-mangament / online read-only site
- you have created an application which enables you to edit data via a form locally
- yet when you publish the site to Vercel, it shows only the data
- this is a practical and safe way to create a content management system for an online website
- you have created an application which enables you to edit data via a form locally