- stages of this project
- get a full backend/frontend MERN stack application running locally
- deploy both backend and frontend at Render.com
- create a starter site based on it
- publish the site at flashcards.tanguay.eu as an open-source application that is used publically
- continually improve it with new features
- source code is here:
- application is live here:
- Render Backend (OLD -- slow spin-up times): ../et042-mernstackapp-backend.onrender.comhttps://et042-mernstackapp-backend.onrender.com
- Cyclic Backend (NEW -- always available): ../et042-mernstackapp-backend.cyclic.apphttps://et042-mernstackapp-backend.cyclic.app
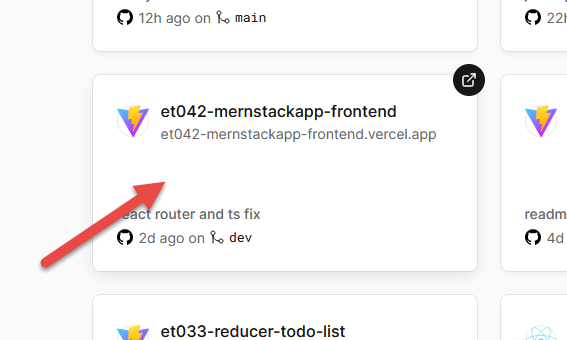
- Frontend: ../et042-mernstackapp-frontend.vercel.apphttps://et042-mernstackapp-frontend.vercel.app
- features
- the features of this site will be held to a minimum for learning purposes
- but all the features are all essential for building a full-stack MERN app
- separate frontend and backend
- frontend
- React
- TypeScript
- useContext
- backend
- Node/Express
- TypeScript
- MongoDB
- Compass
- frontend
- use of a database for data permanence, in our case MongoDB Atlas
- the online database will be used for both the local and online versions
- this eliminates the need to transfer data from a local database to the online database
- is also easier to debug locally
- authentication/authorization
- programatic sending of e-mails (member signup)
- image uploading (profile picture change)
- online deployment at Render.com
- separate frontend and backend
- this application will be a flashcard app
- this topic makes this app:
- (1) a good app for learning the MERN stack
- (2) a useful app as-is which can be customized and extended for one's own purposes
- authentication
- we will use username and password for identification
- passwords will be saved as hashes in the database using bcrypt
- the signup process use e-mail verification
- for this we will use NodeMailer or SendGrid, whichever we can get to work at Render.com
- we will use JWT to assert authentication claims
- to keep authentication straight-forward and basic, we will issue JWT tokens that expire in 60 minutes
- if a user is on the site longer than this, they need to log back in
- for most use cases, users will never experience being logged out
- having an expiration time increases security of the site
- our tokens will be stored in localStorage
- this is straight-forward for learning purposes and safe enough for low-profile sites
- our JWTs have expiration times so even if they continue to exist in localStorage permanently, this is not a security breach
- XSS attacks are resource-intensive to execute and so not a practical concern on low-profile sites, particularly with short-expiration durations
- to keep authentication straight-forward and basic, we will issue JWT tokens that expire in 60 minutes
- we will use username and password for identification
- authorization
- I will be using an access-group concept for authorization
- this is a concept I created myself for my Datapod project and have refined throughout the years
- a unique characteristic of this approach is the anonymousUser
- this is a concept based on the Null object pattern
- any user that comes to the page is immediately identified by the application as anonymousUser
- this means that every user is always identified as a particular user and has the rights of the groups to which they are assigned
- the anonymousUser in most use cases only belongs to the group loggedOutUsers
- this authorization pattern works well to granually assign users rights based on groups
- accessGroups
- loggedOutUsers
- are not logged in
- e.g. users new to the site or members who have not logged in yet
- can test themselves on the flashcards, but cannot mark their process
- in menu there is a login page but no logout page
- are not logged in
- loggedInUsers
- in menu there is a logout page but no login page
- members
- have identified themselves with username/password
- have their own profile page where they can change their information
- see extra member-specific information on the welcome page
- can record their progress when testing themselves on flashcards, e.g. mark if they have learned it or not
- can view a Members page which shows all members sorted by how many flashcards they have learned
- contributors
- can add, edit, delete and delete flashcards
- administrators
- can add, edit, delete and delete flashcards
- can add, edit, delete and delete users
- loggedOutUsers
- I will be using an access-group concept for authorization
- responsive
- application can be used on all computer screens as well as all common smart phones and tablets
- sign-up with email verification
- image upload for profile picture
- frontend and backend in TypeScript
- menu
- Welcome, Flashcards, Members, Login, Logout
- this topic makes this app:
- (1) create local Node/Express backend in JavaScript
- set up local project structure, the name for my project is
et042-mernstackapp, choose your own name- create two directories in a project directory:
- /et042-mernstackapp
- /et042-mernstackapp-backend
- /et042-mernstackapp-frontend
- /et042-mernstackapp
- create two directories in a project directory:
- make the simplest Node/Express server that servers "testing" at router "/"
- create npm project
npm init -y
- create local git repository
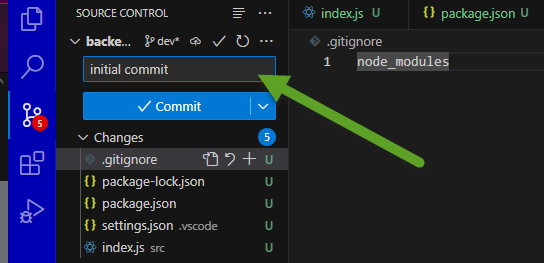
git init -b dev- .gitignore
- node_modulesdist
- make first local commit
- install Express
npm i express
- src/index.js
- import express from 'express';const app = express();const port = 3601;app.get('/', (req, res) => {res.send('testing');});app.listen(port, () => {console.log(`listening on post http://localhost:${port}`);});
- create npm command to start backend
- package.json
- "scripts": {"dev": "node ./src/index.js"},
- package.json
- enable ES6 modules
- package.json
- "type": "module",
- package.json
- start the API with
npm run dev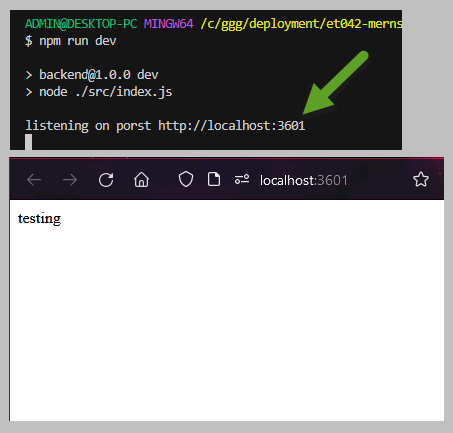
- create npm project
- set up local project structure, the name for my project is
- (2) convert Node/Express backend to TypeScript
- because we don't have a framework like Vite in the backend, we have to set up JavaScript compiling ourselves
- install TypeScript as a dev dependency
npm i -D typescript
- install nodemon as a dev dependency
- nodemon is a tool that will watch our TypeScript files and each time they are changes, we will
- (1) compile our TypeScript files into JavaScript files which can be run by Node
- (2) restart Node so we see our changes
npm i -D nodemon
- nodemon is a tool that will watch our TypeScript files and each time they are changes, we will
- change
index.jstoindex.ts- you will notice that there are ellipses markers in the code
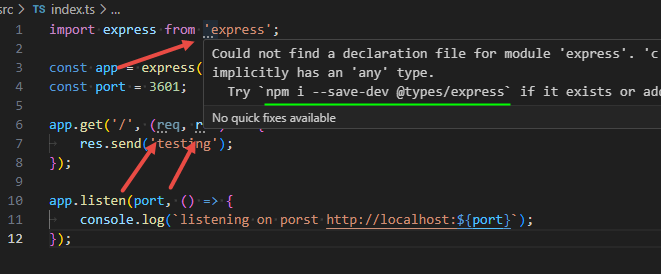
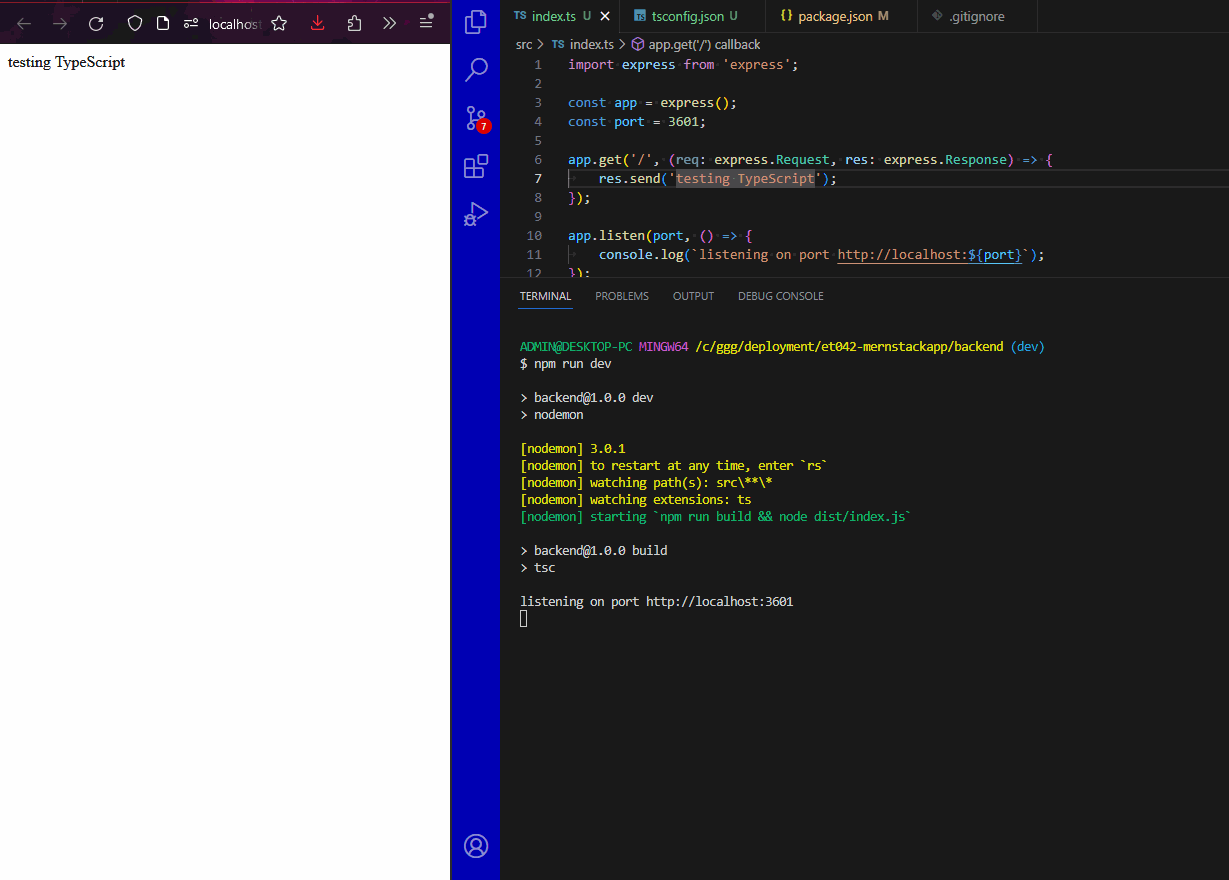
- install the @types for Express so that these no longer appear
npm i -D @types/express
- now add types for
reqandres- app.get('/', (req: express.Request, res: express.Response) => {res.send('testing TypeScript');});
- now you can add types to any Express objects, e.g.
reqandres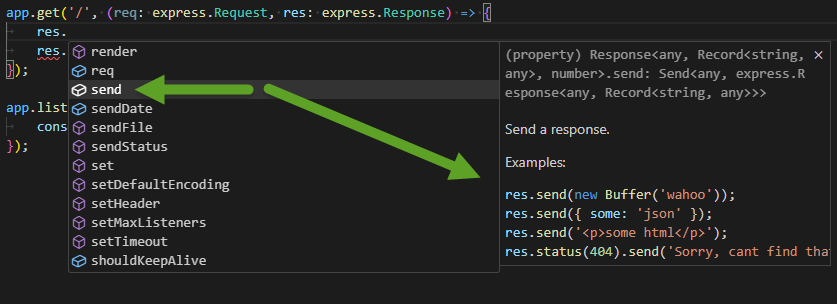
- you will notice that there are ellipses markers in the code
- set up TypeScript config file
- tsconfig.json
- {"compilerOptions": {"module": "NodeNext","moduleResolution": "NodeNext","target": "ES2020","sourceMap": true,"outDir": "dist",},"include": ["src/**/*"]}
- edit the package.json file so that nodemon watches TypeScript files and recompiles them to JavaScript whenever they change
- "nodemonConfig": {"watch": ["src"],"ext": "ts","exec": "npm run build && node dist/index.js"},
- now in package.json have
npm run devstart nodemon, and have build run the TypeScript compiler, note thatnpm run buildwill create transpiled JavaScript files in thedistdirectory- "scripts": {"dev": "nodemon","build": "tsc"},
- tsconfig.json
- the backend API is now running on TypeScript
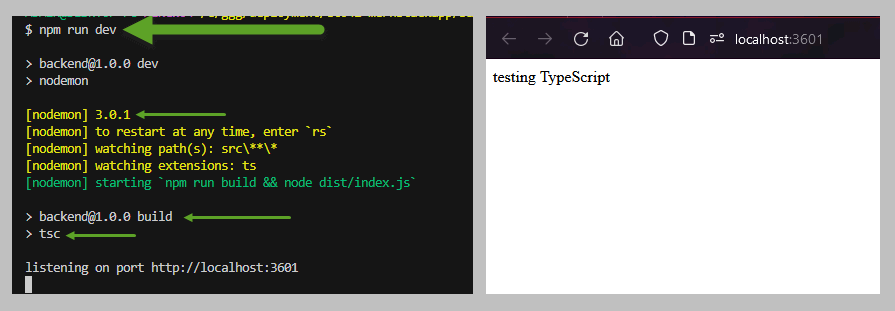
- note that when you change any .ts file, nodemon will compile your typescript files and restart Node
- the next hit to the API route will reflect the changes
- the next hit to the API route will reflect the changes
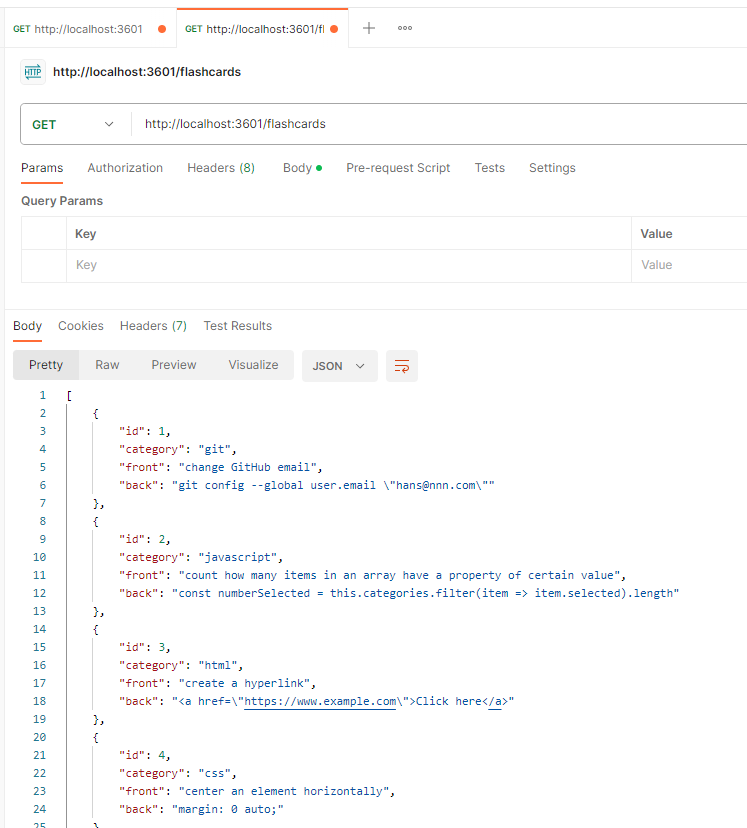
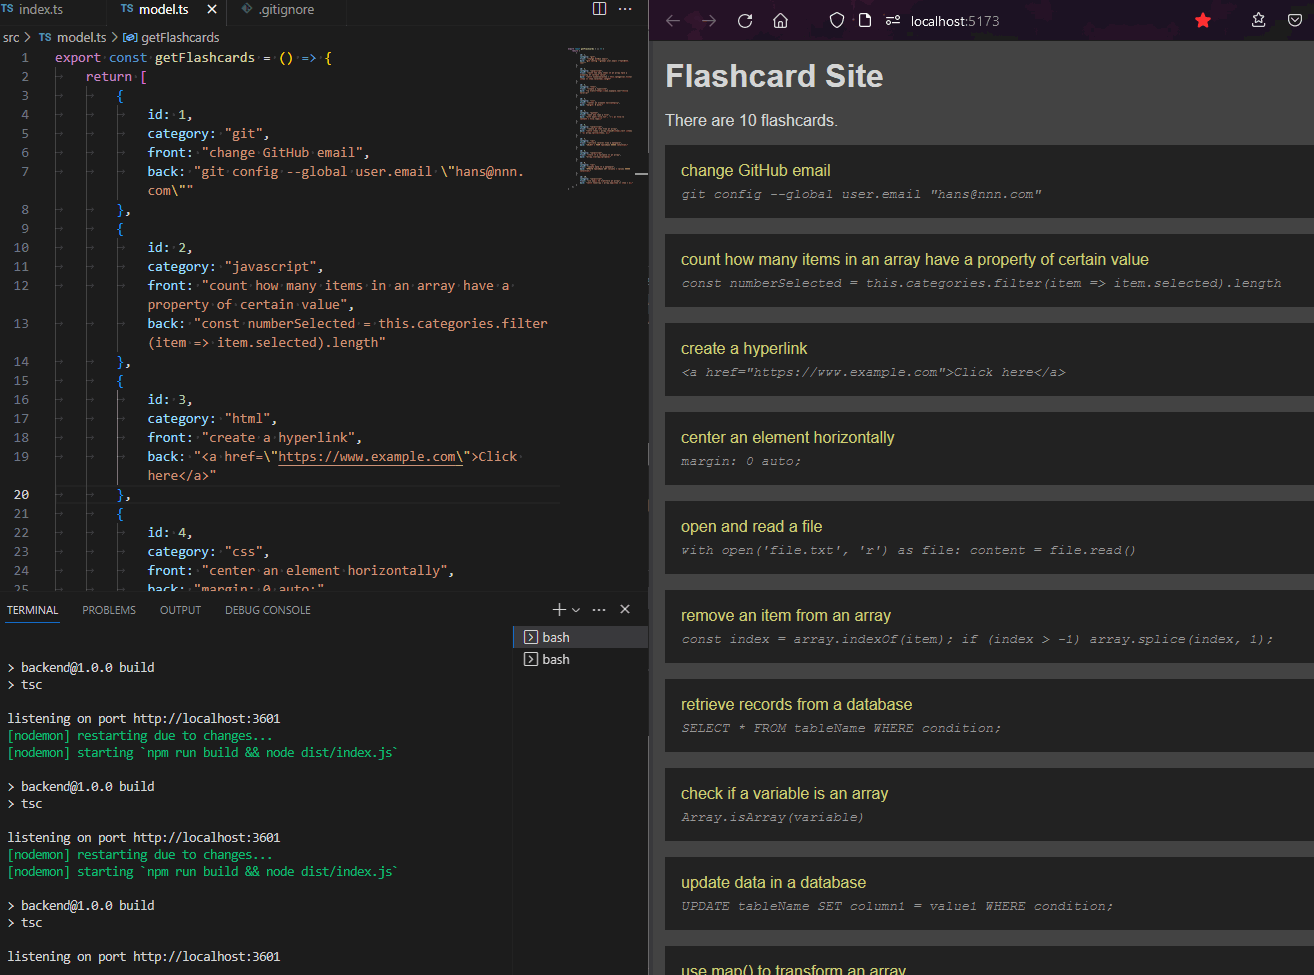
- (3) Add realistic data (an array of flashcard items) and test with browser, Rest Client and Postman
- at this point
- src/model.ts
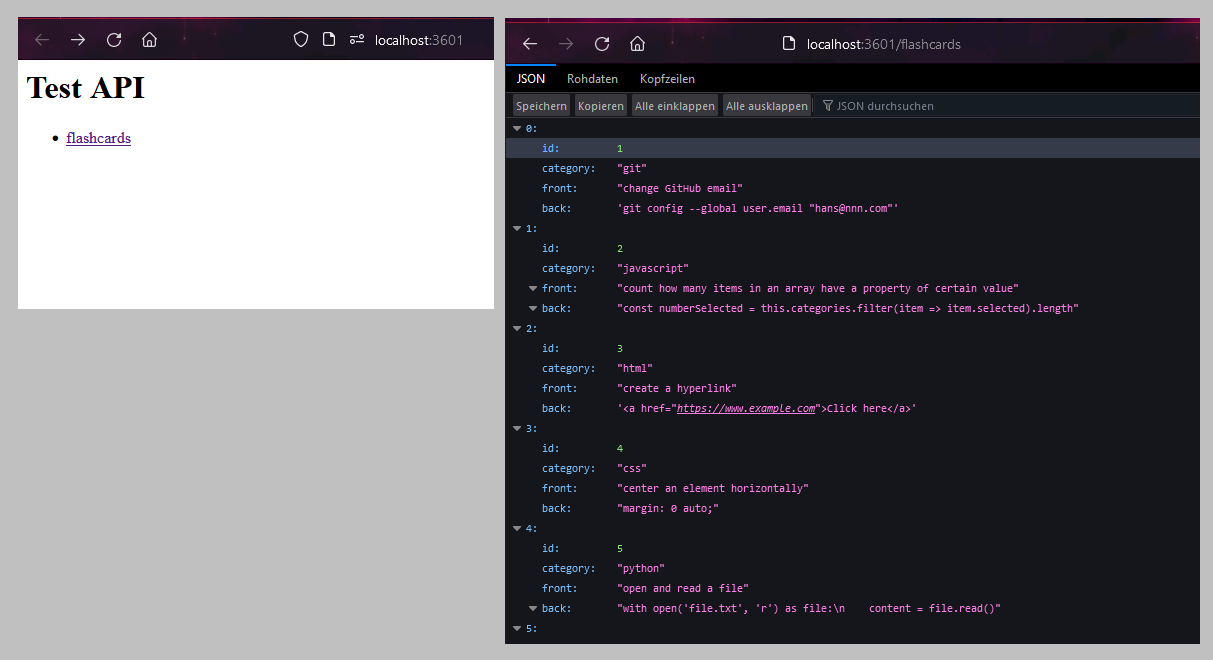
- export const getFlashcards = () => {return [{id: 1,category: "git",front: "change GitHub email",back: "git config --global user.email \"hans@nnn.com\""},{id: 2,category: "javascript",front: "count how many items in an array have a property of certain value",back: "const numberSelected = this.categories.filter(item => item.selected).length"},{id: 3,category: "html",front: "create a hyperlink",back: "<a href=\"https://www.example.com\">Click here</a>"},{id: 4,category: "css",front: "center an element horizontally",back: "margin: 0 auto;"},{id: 5,category: "python",front: "open and read a file",back: "with open('file.txt', 'r') as file:\n content = file.read()"},{id: 6,category: "javascript",front: "remove an item from an array",back: "const index = array.indexOf(item);\nif (index > -1) array.splice(index, 1);"},{id: 7,category: "sql",front: "retrieve records from a database",back: "SELECT * FROM tableName WHERE condition;"},{id: 8,category: "javascript",front: "check if a variable is an array",back: "Array.isArray(variable)"},{id: 9,category: "sql",front: "update data in a database",back: "UPDATE tableName SET column1 = value1 WHERE condition;"},{id: 10,category: "javascript",front: "use map() to transform an array",back: "const newArray = array.map(item => item * 2);"}];}
- in index.ts, create a new route for flashcards
- import { getFlashcards } from './model.js';app.get('/flashcards', (req: express.Request, res: express.Response) => {res.json(getFlashcards());});
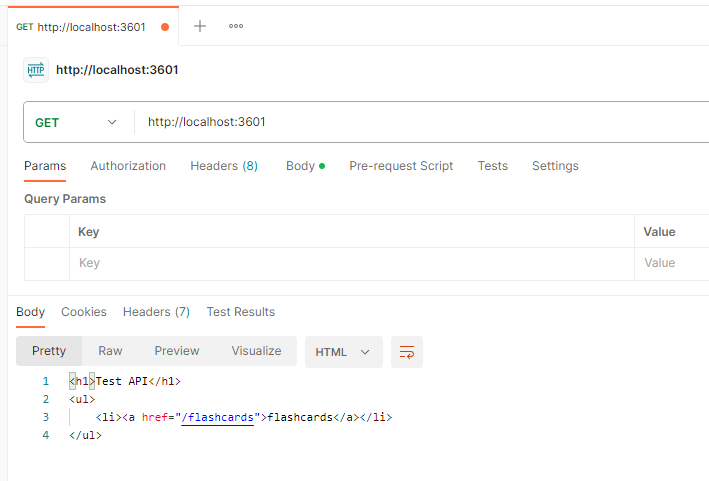
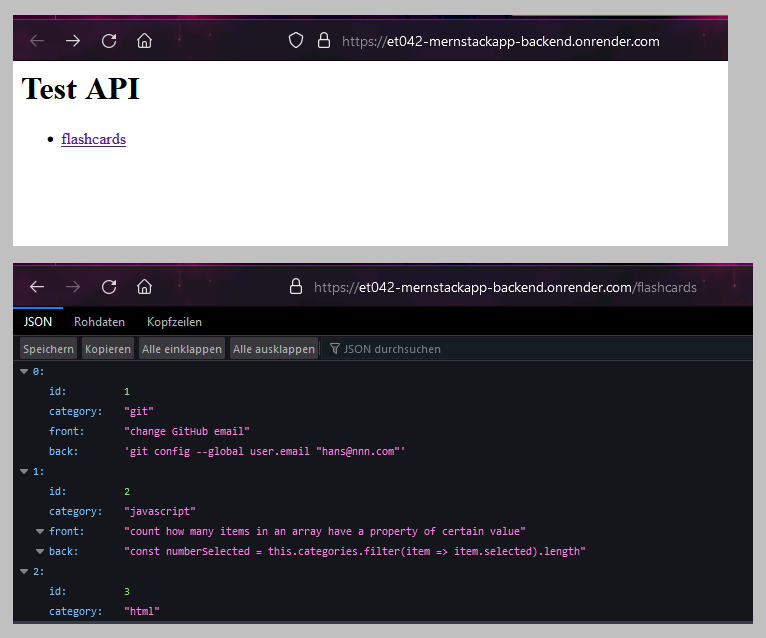
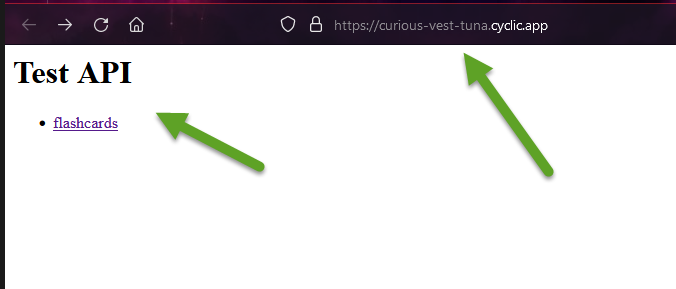
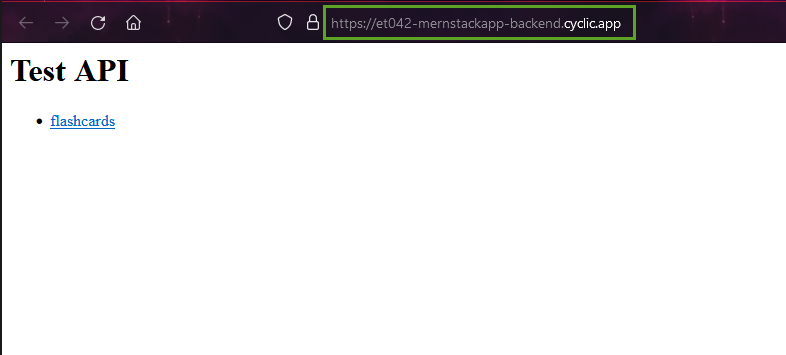
- update the root route in index.ts so that it shows a documentation of the API
- app.get('/', (req: express.Request, res: express.Response) => {res.send(`<h1>Test API</h1><ul><li><a href="/flashcards">flashcards</a></li></ul>`);});
- test both routes in the browser
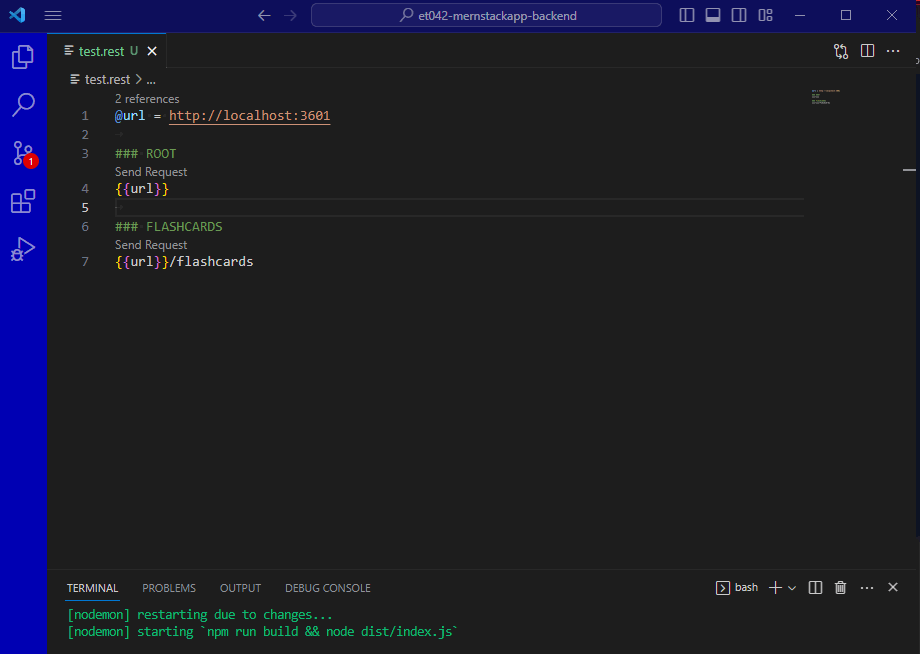
- now test with the REST Client extension
- install extension

- test.rest
- @url = http://localhost:3601### ROOT{{url}}### FLASHCARDS{{url}}/flashcards
- you can now test your routes by clicking on links created by REST Client
- install extension
- now test with Postman
- install Postman
- test the root route:
- test the flashcards route:
- (4) Create frontend project that reads flashcards from the backend and displays them in the frontend website
- create Vite React site
- in terminal, go to
et042-mernstackapp\et042-mernstackapp-frontend npm create vite@latest .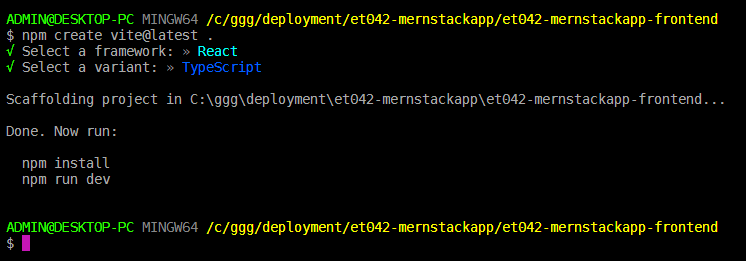
- in terminal, go to
- open VSCode in the newly created React project
code .
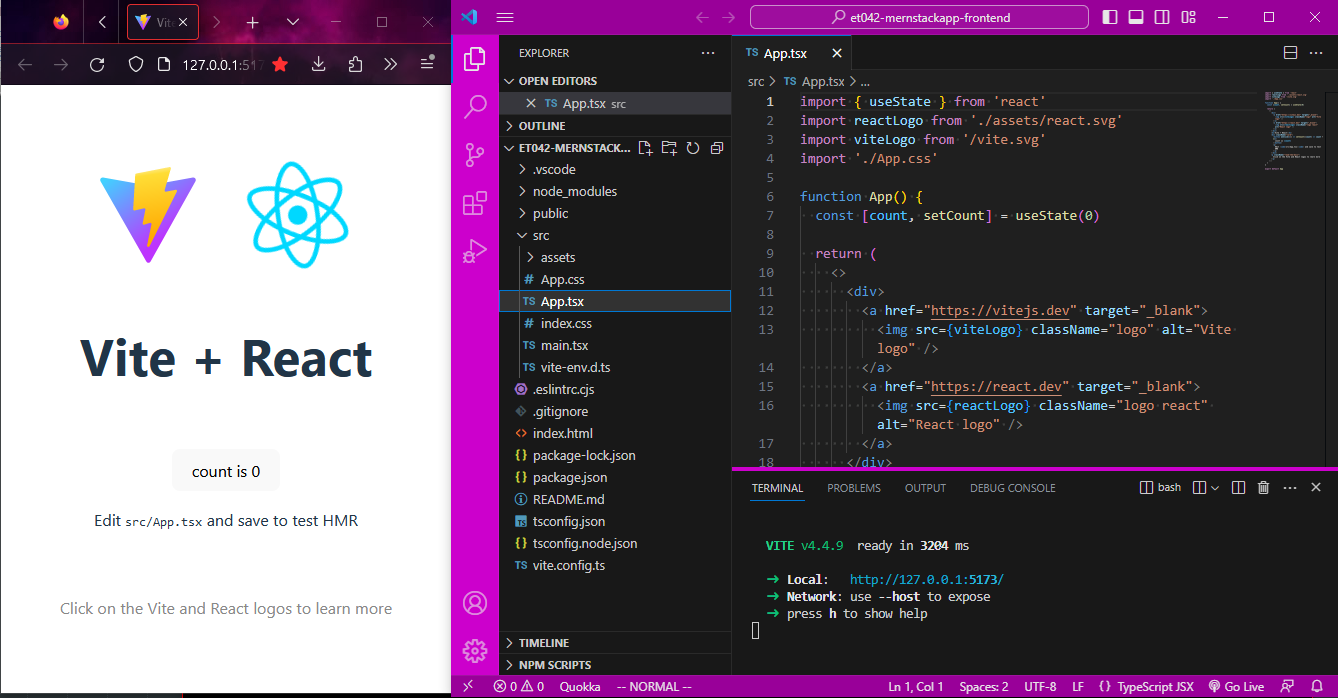
- set up and start basic Vite React site
- open VSCode terminal
npm inpm run dev- looks like this:
- set up Git repository
- open new terminal window in VSCode
git init -b dev- make initial commit
- minimize site
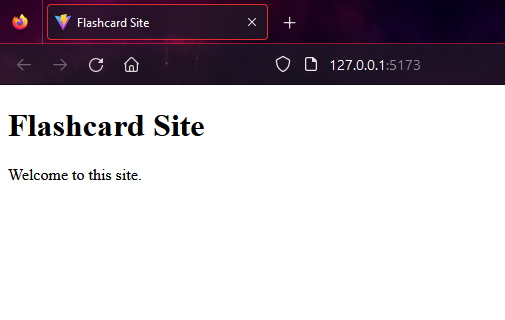
- index.html
- <title>Flashcard Site</title>
- assets directory - delete
- App.css - clear content
- index.css - clear content
- main.tsx - remove
<React.StrictMode>(don't need this testing feature, and it causes problems later) - App.tsx
- import './App.css';function App() {return (<div><h1>Flashcard Site</h1><p>Welcome to this site.</p></div>)}export default App;
- minimized site looks like this
- index.html
- give site minimal styling
- install Sass
npm i -D sass- rename extensions of App.css and index.css and their references to
.scss
- index.scss
- * {margin: 0;padding: 0;box-sizing: border-box;}
- all styles should be reset
- App.scss
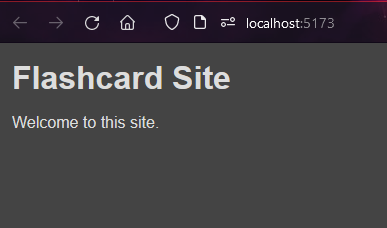
- body {background-color: #444;color: #ddd;padding: 1rem;font-family: sans-serif;h1 {margin-bottom: 1rem;}}
- site is now minimally styled
- install Sass
- display flashcards from backend on the main page
- install axios
npm i axios
- App.tsx
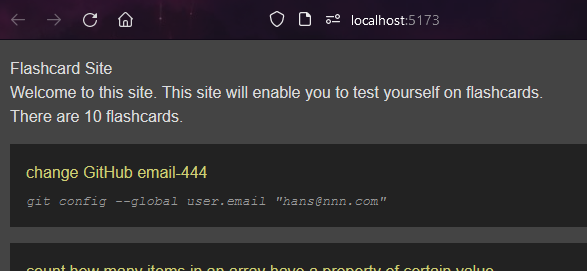
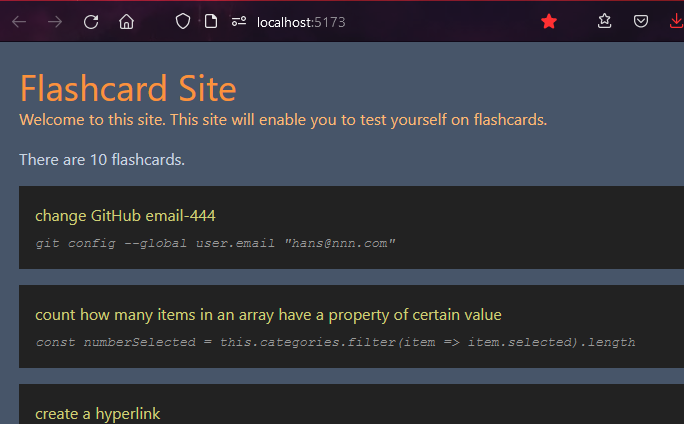
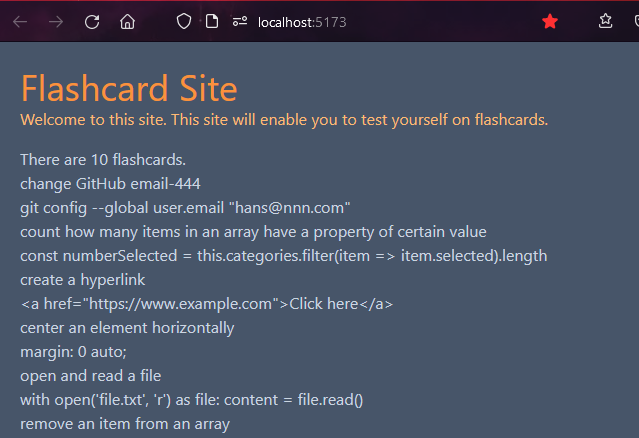
- import { useState, useEffect } from 'react';import axios from 'axios';import './App.scss';const backendUrl = 'http://localhost:3601';function App() {const [flashcards, setFlashcards] = useState([]);useEffect(() => {(async () => {const _flashcards = (await axios.get(`${backendUrl}/flashcards`)).data;setFlashcards(_flashcards);})();}, []);return (<div><h1>Flashcard Site</h1><p>There are {flashcards.length} flashcards.</p></div>)}export default App;
- PROBLEM: you will notice you get a CORS error
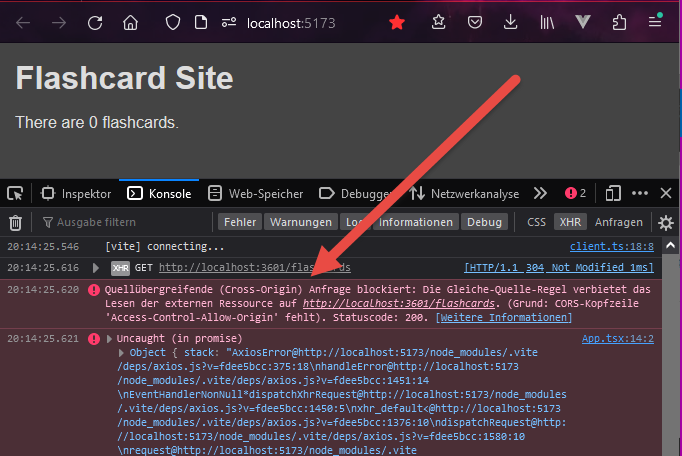
- SOLUTION: set up CORS with default values on the backend
- install cors
npm i corsnpm i -D @types/cors(for TypeScript)
- add cors lines to index.ts
- import express from 'express';import { getFlashcards } from './model.js';import cors from 'cors';const app = express();app.use(cors());const port = 3601;
- reload frontend:

- install cors
- SOLUTION: set up CORS with default values on the backend
- show the flashcards
- App.tsx
- <p>There are {flashcards.length} flashcards.</p>{flashcards.map(flashcard => {return (<div className="flashcard"><div className="front">{flashcard.front}</div><div className="back">{flashcard.back}</div></div>)})}
- App.scss
- div.flashcard {background-color: #222;margin-top: 1rem;padding: 1rem;div.front {color: rgb(207, 207, 118);}div.back {color: #999;font-style: italic;font-family: courier;margin-top: .5rem;font-size: .8rem;}}
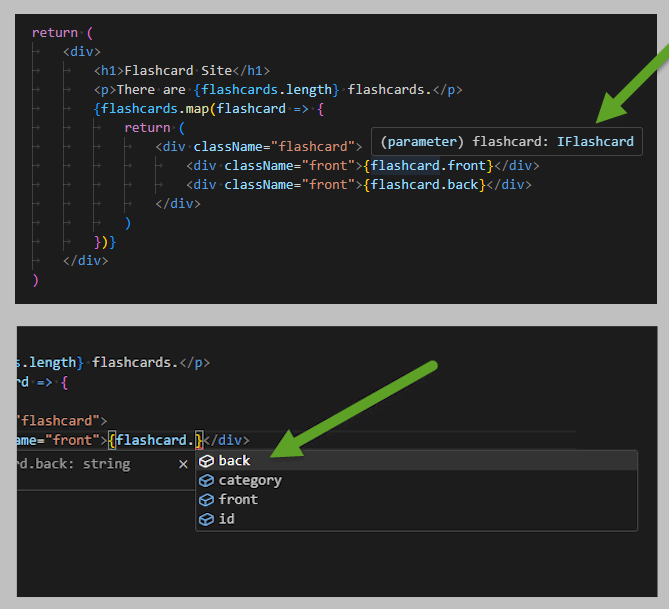
- PROBLEM: the site works in JavaScript, but TypeScript is showing an error since it doesn't know what structure of a "flashcard" object
- note that while you have TypeScript errors, your project run the browser locally
- but it will not compile (
npm run build) and so cannot be deployed until you resolve the TypeScript errors
- but it will not compile (
- SOLUTION: create an interface for flashcards
- src/interfaces.ts
- export interface IFlashcard {id: number;category: string;front: string;back: string;}
- App.tsx
- import { IFlashcard } from './interfaces';const [flashcards, setFlashcards] = useState<IFlashcard[]>([]);
- note that your variable flashcard is identified as of type IFlashcard, and you get intellisense when typing properties on the variable
- src/interfaces.ts
- note that while you have TypeScript errors, your project run the browser locally
- App.tsx
- install axios
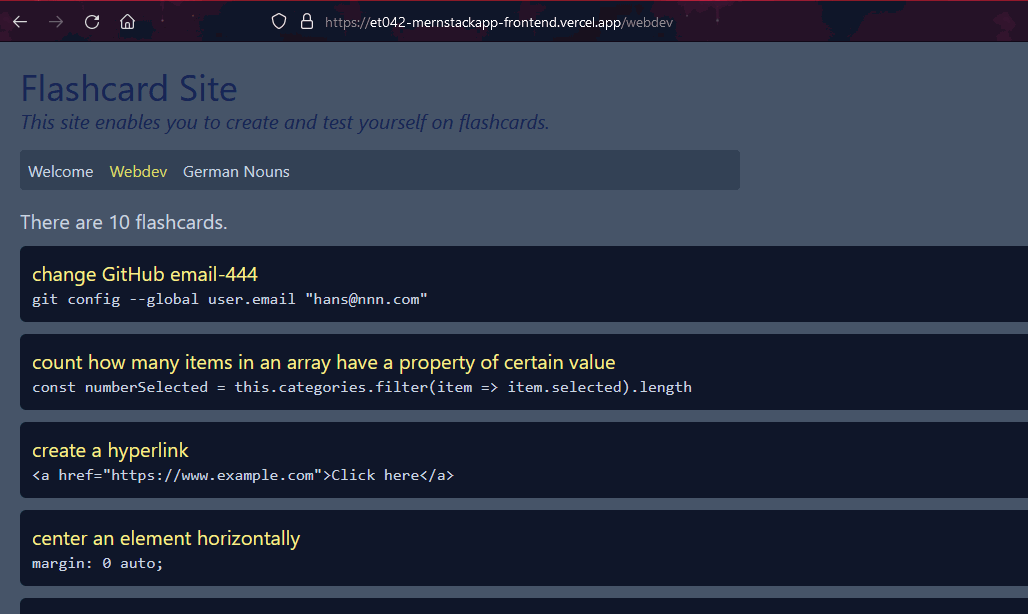
- the local frontend now reads data successfully from the local backend
- create Vite React site
- (5) Publish backend at Render.com
- push both backend repository to GitHub
- set up account at render.com
- sign up with Google account
- create a "web service" and deploy it
- New
- Web Service
- click Connect on your backend repository, e.g. et042-mernstackapp-backend
- add to package.json
- "build": "npm install && tsc","start": "node dist/index.js"
- git push
- fill in form
- Name:
et004-render-test - Build Command:
npm run build - Start Command:
npm start
- Name:
- Create Web Service
- looks good:
- looks good:
- site works:
- test with Postman

- (6) Publish frontend at Vercel and read data from API at Render.com
- enable app to get its backend url not from code but from the environment variable file
- the environment variable file is called .env
- locally it contains a variable for the local backend URL
- at Vercel, we will enter an environment variable which will contain the URL for our Render.com backend
- create file for environment variables
- .env
- VITE_BACKEND_URL = http://localhost:3601
- add the
.envdirectory to the list of files and directories for Git to ignore- so that it doesn't get pushed to your GitHub repository
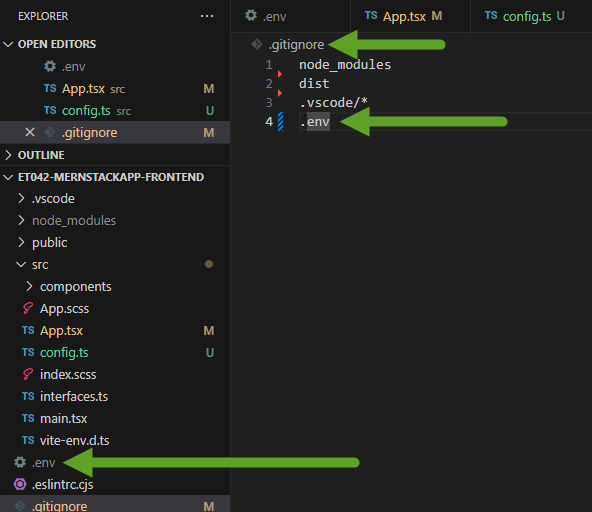
- so that it doesn't get pushed to your GitHub repository
- .env
- read the backend url from the environment variable you just created
- App.tsx
- const backendUrl = import.meta.env.VITE_BACKEND_URL;
- to test that this variable is being correctly read add in App.tsx
- <h1>Flashcard Site</h1><p>BACKEND URL: {import.meta.env.VITE_BACKEND_URL}</p>
- App.tsx
- the environment variable file is called .env
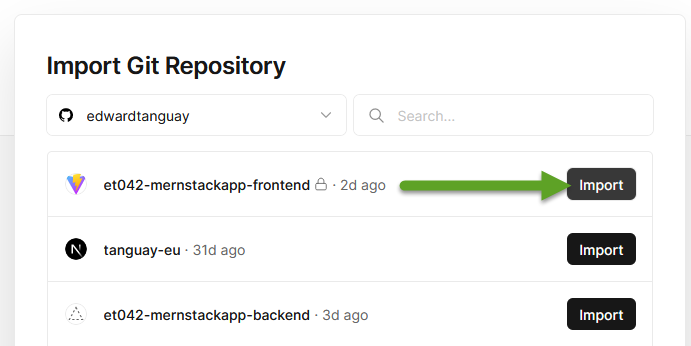
- publish site to Vercel
- push to GitHub
- got to ../vercel.comhttps://vercel.com
- New > Project
- click on the Import button for your frontend project
- click on Environment Variables and add
- key: VITE_BACKEND_URL
- value: ../et042-mernstackapp-backend.onrender.comhttps://et042-mernstackapp-backend.onrender.com
- be sure to click Add

- click Deploy
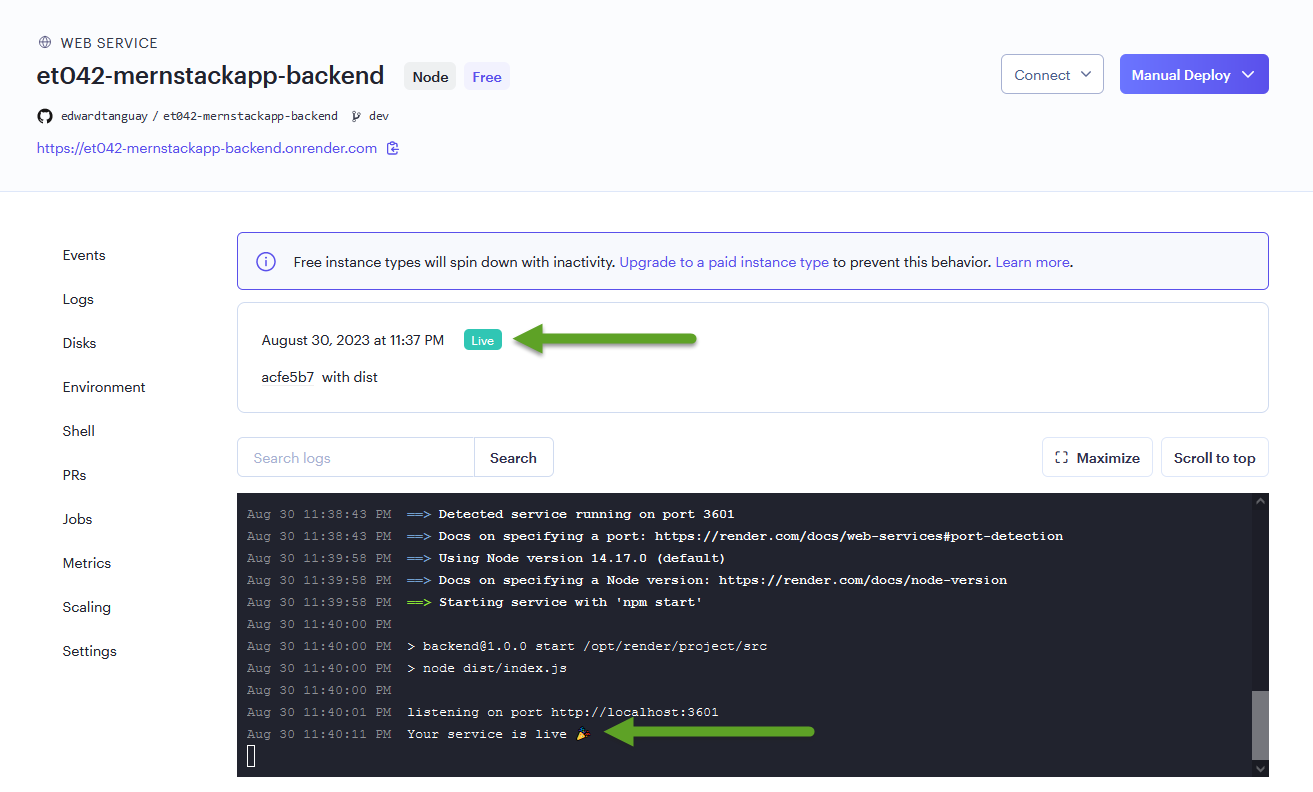
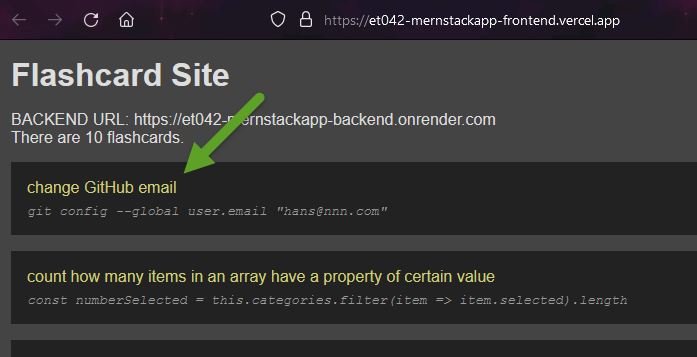
- after about 20 seconds, you should see that your online site reads data from your Render.com backend:
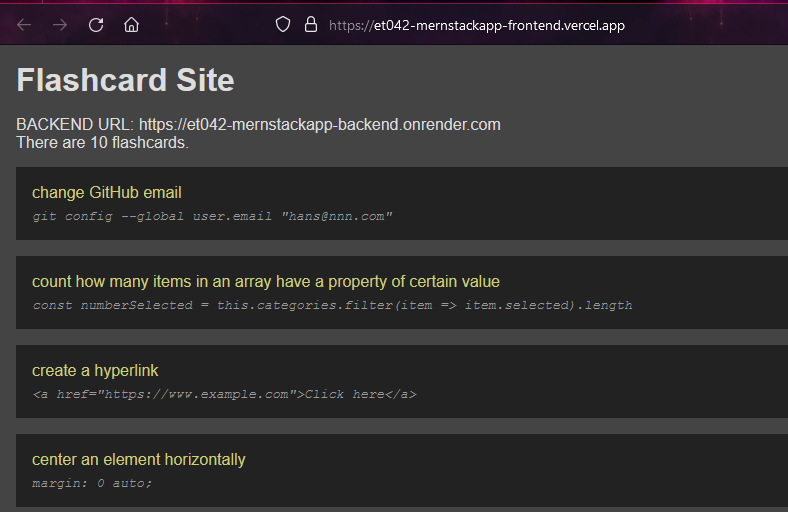
- test that the Vercel site is really fetching data from the Render.com site
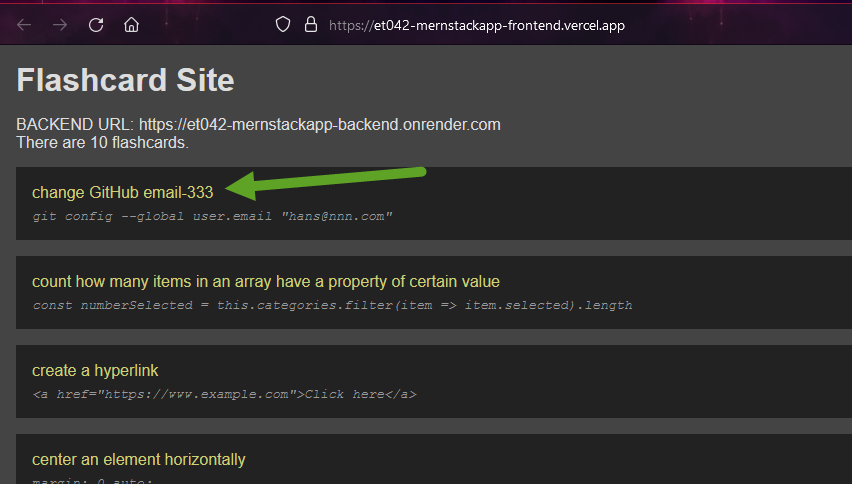
- delete the test message "BACKEND URL: ..."

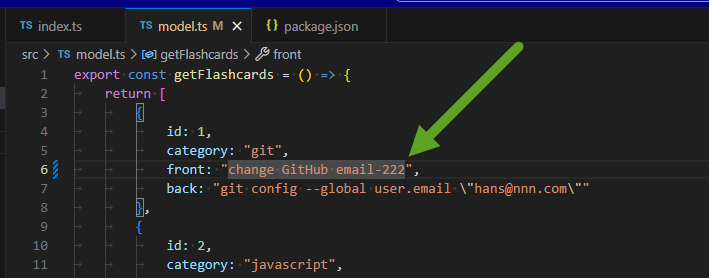
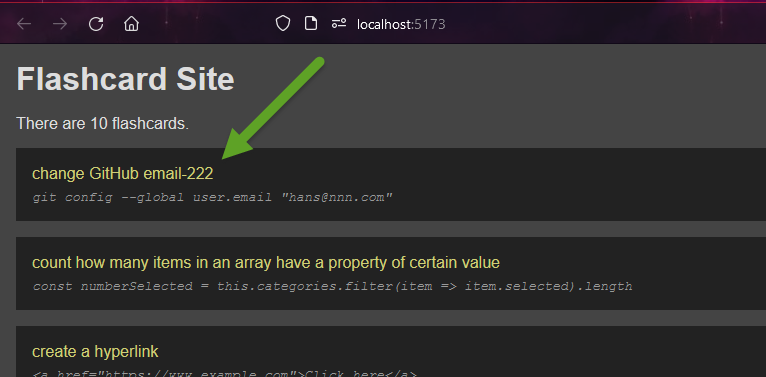
- in the backend's model.ts file, change the first item's title:
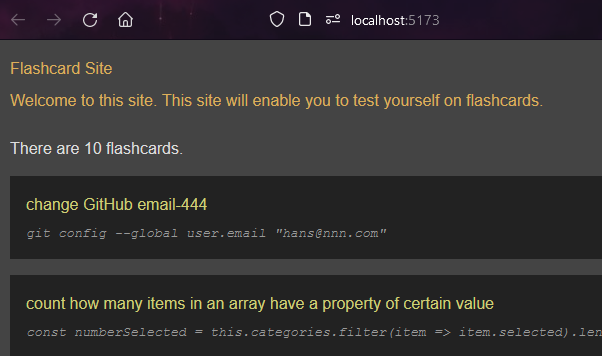
- view the site locally:
- now view the Vercel site:
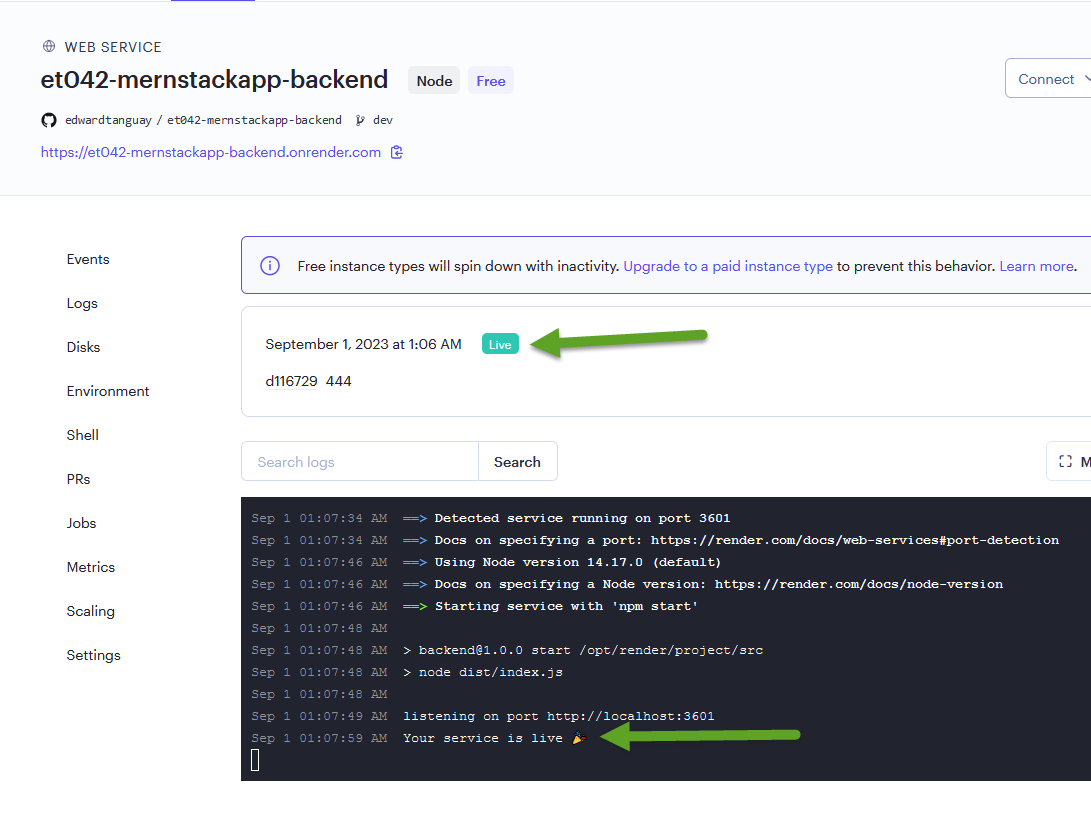
- now push the backend to its GitHub repository
- Render.com will notice the push and start building the site
- go to your Render.com dashboard and see that it is building
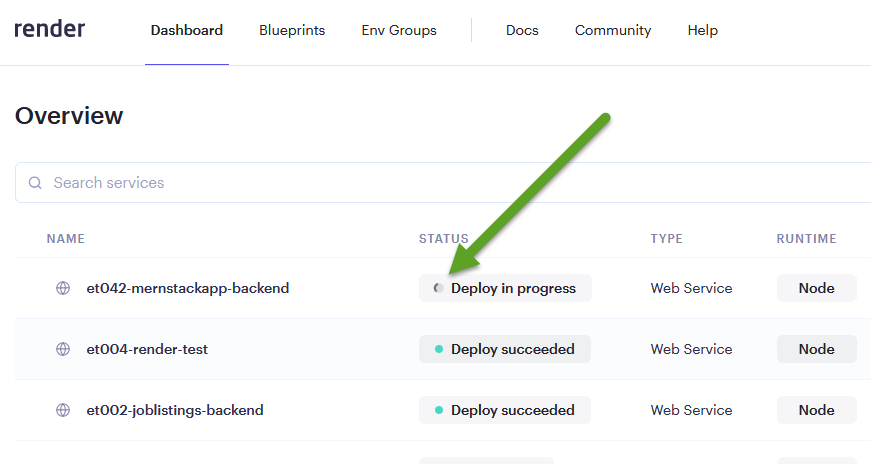
- unfortunately, the Render.com seems to be stuck on "in progress"
- after 15 minutes, it's still stuck
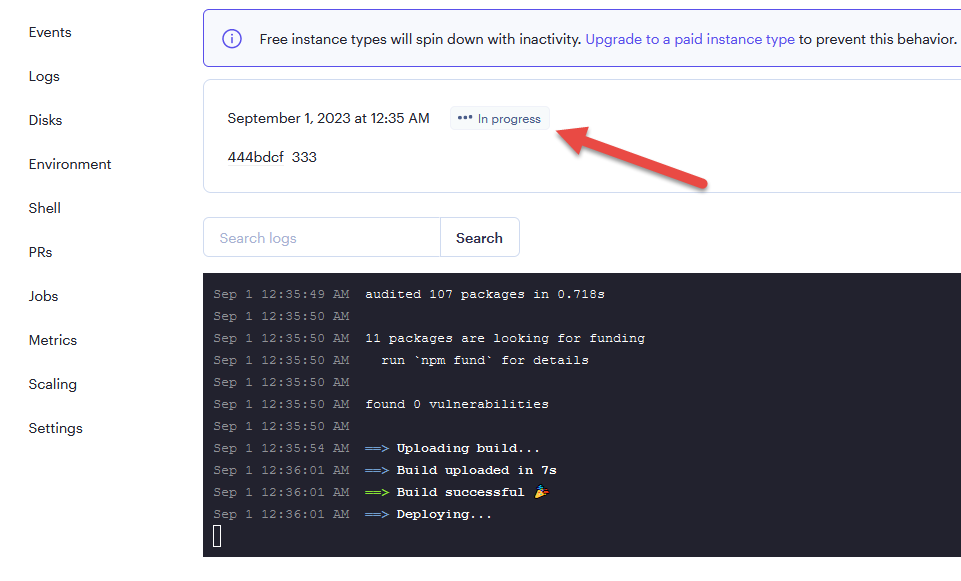
- eventually it published, though:
- delete the test message "BACKEND URL: ..."
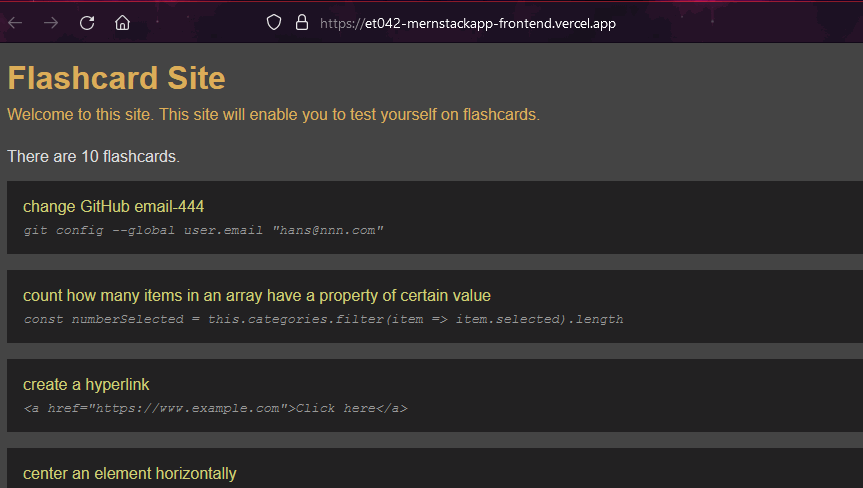
- test again with 444
- the deployment starts immediately
- was live without 60 seconds this time
- you see that the Vercel frontend fetches data from the Render.com backend
- the next morning I went to ../et042-mernstackapp-frontend.vercel.apphttps://et042-mernstackapp-frontend.vercel.app
- it took 16 seconds for the backend on Render.com to wake up and send data
- enable app to get its backend url not from code but from the environment variable file
- (7) Create a loading spinner for the frontend
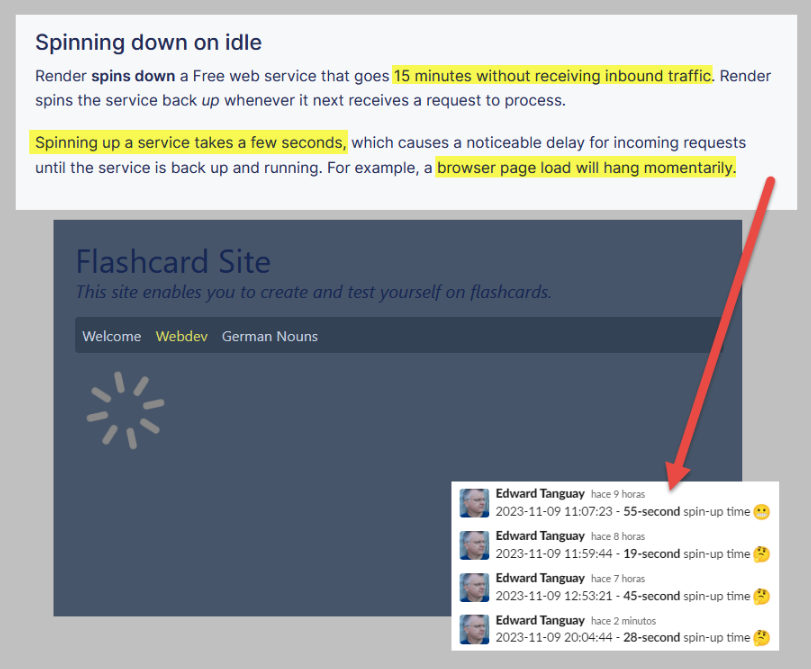
- Note that the Render.com:
- free instance types will spin down with inactivity
- web services on the free instance type are automatically spun down after 15 minutes of inactivity
- when a new request for a free service comes in, Render spins it up again so it can process the request
- this will cause a delay in the response of the first request after a period of inactivity while the instance spins up
- this is why in this section, we are going to create a loading spinner for the frontend
- if your website has not been used in the last 15 minutes, then
- when the Frontend tries to fetch data from it
- it will take from 15-40 seconds (in my experience) to spin up and send data to the front end
- therefore, if the full-stack app you are creating is intended to actually be used by people
- you want to give them some indication that the data for the website is loading
- and give them something to read/do while the data is loading
- in this way, you can use the free-tier at Render.com and Vercel for more or less useful online applications at no cost
- if another person accesses the site before 15 minutes after the last user accessed it
- the spinner will appear for less than a second
- this may cause an unpleasant flicker, which is not a positive user experience
- therefore we will build in a default wait of 1 second in all cases
- so that the user has the feeling that "data is loading"
- see my jobs.tanguay.eu site which uses this feature as well
- if your website has not been used in the last 15 minutes, then
- free instance types will spin down with inactivity
- install and test React Icons
npm i react-icons- App.tsx
- import { FiLoader } from 'react-icons/fi';<FiLoader className="spinner" />
- you should see the loading spinner, but it will not be spinning yet
- for that we need CSS
- change the JSX so that the spinner is shown while there are no flashcards yet
- App.tsx
- <h1>Flashcard Site</h1><p className="intro">Welcome to this site. This site will enable you to test yourself on flashcards.</p>{flashcards.length === 0 ? (<FiLoader className="spinner" />) : (<><p>There are {flashcards.length} flashcards.</p>{flashcards.map(flashcard => {return (<div className="flashcard" key={flashcard.id}><div className="front">{flashcard.front}</div><div className="back">{flashcard.back}</div></div>)})}</>)}
- App.tsx
- add styling and animation
- App.scss
- $header-color: rgb(221, 175, 90);h1 {margin-bottom: .5rem;color: $header-color;}.intro {margin-bottom: 1.5rem;color: $header-color;}.spinner {font-size: 6rem;margin-left: .5rem;color: #888;animation: spin infinite 2s linear;}@keyframes spin {from {transform: rotate(0deg);}to {transform: rotate(360deg);}}
- App.scss
- now if the data takes several seconds to load
- the loading spinner will be shown during that time
- PROBLEM: if the data is available, it will still take a fraction of a second to load (from Render.com to Vercel)
- this will cause an unpleasant flicker of the loading spinner
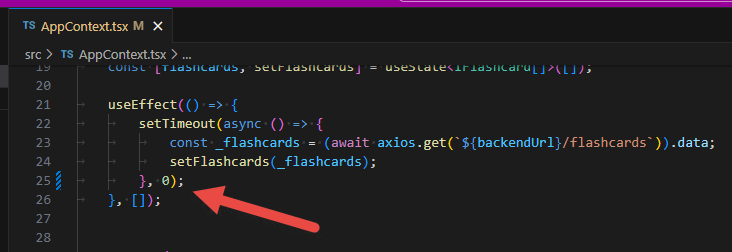
- SOLUTION: force a default time of one second to load in all cases
- this gives the user the feeling that data is loading, whether it is 1 second or 25
- to implement this solution, we merely need to wrap the data loading in a timeout callback which waits for one second before fetching the data
- App.tsx
- useEffect(() => {setTimeout(async () => {const _flashcards = (await axios.get(`${backendUrl}/flashcards`)).data;setFlashcards(_flashcards);}, 1000);}, []);
- App.tsx
- push the frontend changes to GitHub
- your online site should now work like this
- I hadn't visited this site in over 15 minutes and it took 17 seconds to load
- showing the loading spinner the whole time
- after that, when I reload the page, it takes only 1 second:
- I hadn't visited this site in over 15 minutes and it took 17 seconds to load
- Note that the Render.com:
- (8) Install Tailwind
- when working with component-based JavaScript frameworks
- Tailwind is an elegant solution to styling
- we will now install Tailwind alongside Sass
- then convert the styling from Sass that makes more sense in Tailwind (H1 and intro styling)
- and leave the styling that makes more sense to be in Sass (the animation, etc.)
- install Tailwind
npm install -D tailwindcss postcss autoprefixer
- create the necessary Tailwind config files
npx tailwindcss init -p
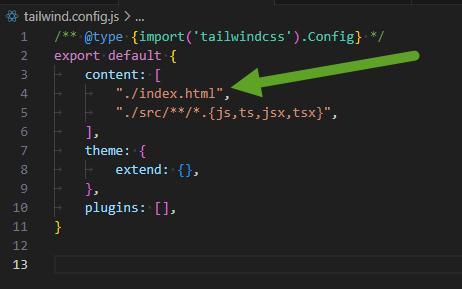
- update tailwind.config.js
- content: ["./index.html","./src/**/*.{js,ts,jsx,tsx}",],
- replace content of index.scss with this
- @tailwind base;@tailwind components;@tailwind utilities;
- reduce styles to one file: index.scss
- I find working with a combination of Tailwind and Sass to be very effective
- each has its advantages:
- Tailwind: styling components inline on the spot
- instead of having to create class names and then the classes in other files
- Sass: animations, mixins, global styles and oversights in Tailwind such as the lack of
font-variant: small-caps
- Tailwind: styling components inline on the spot
- each has its advantages:
- so in small to medium-size applications, having one .scss file is enough
- most of your styles in inline throughout your application anyway
- and this way you have all extra styling in one place, whether Tailwind @apply styles or Sass styling
- copy contents into index.scss and delete App.scss
- I find working with a combination of Tailwind and Sass to be very effective
- your site should now look like this:
- now let's convert our styling into Tailwind as much as makes sense
- delete the H1 and .intro styles
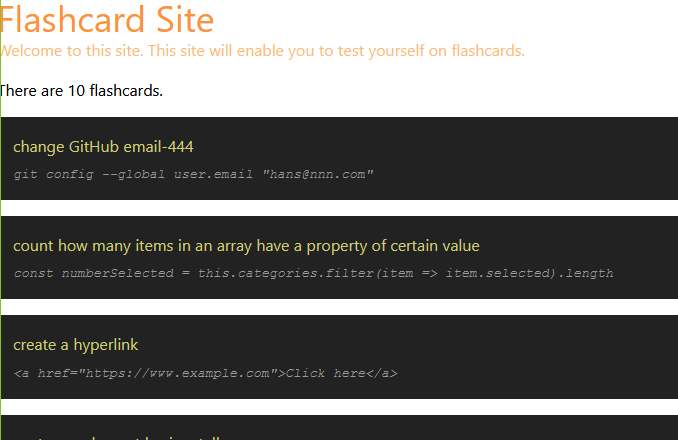
- site looks like this
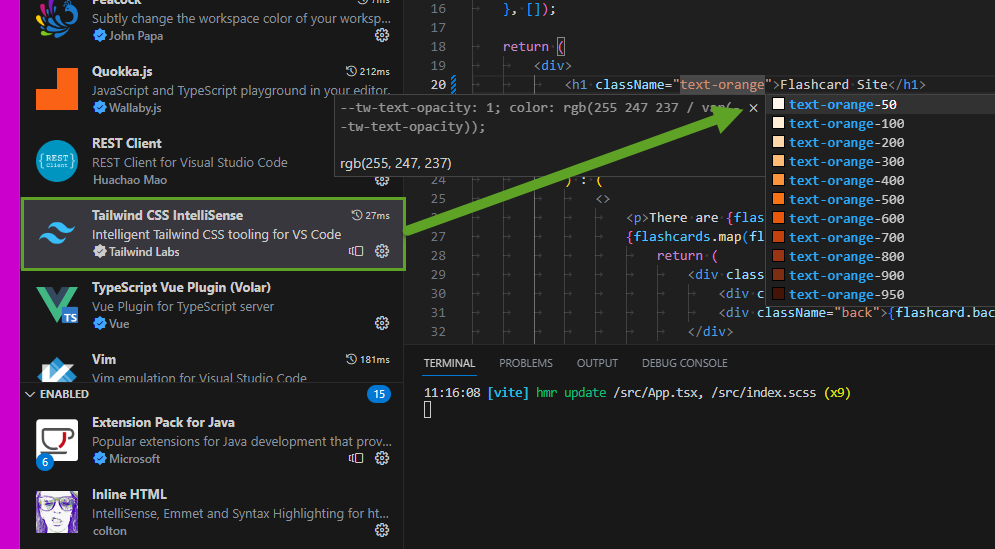
- now implement these styles with Tailwind in App.tsx
- <h1 className="text-orange-400 text-4xl">Flashcard Site</h1><p className="text-orange-300 mb-4">Welcome to this site. This site will enable you to test yourself on flashcards.</p>
- make sure you have the Tailwind CSS IntelliSense extension installed
- so that you get this intellisense as you write Tailwind:
- so that you get this intellisense as you write Tailwind:
- in index.scss delete all body styles
- site should look like this:
- add body styles with Tailwind
- notice that you can also use Tailwind in the index.html file, because of this setting:
- be sure to use class and not className
- <body class="bg-slate-600 p-6 text-slate-300">
- be sure to use class and not className
- notice that you can also use Tailwind in the index.html file, because of this setting:
- site now looks like this:
- in index.scss, delete all flashcard styles
- site now looks like this
- App.tsx add Tailwind styles
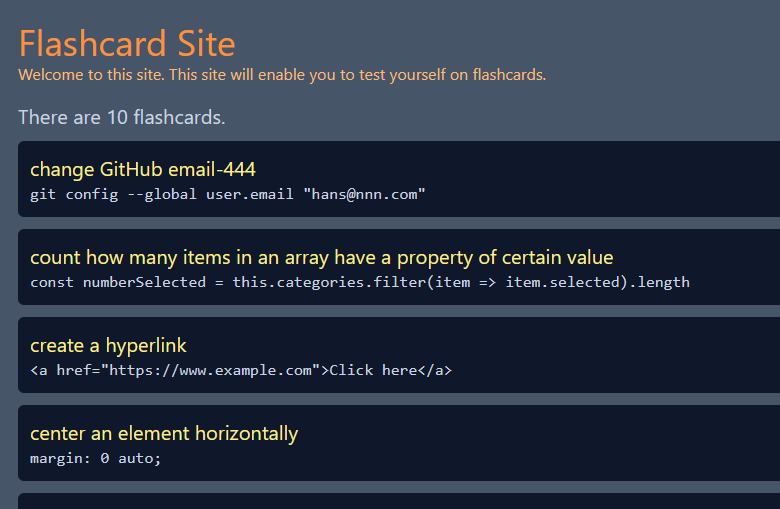
- <><p className="text-xl">There are {flashcards.length} flashcards.</p>{flashcards.map(flashcard => {return (<div className="bg-slate-900 p-3 mt-3 rounded-md" key={flashcard.id}><div className="text-yellow-200 text-xl">{flashcard.front}</div><div className="font-mono">{flashcard.back}</div></div>)})}</>
- site now looks like this:
- when working with component-based JavaScript frameworks
- (9) Implement React Router 6.4 and useContext
- we now want to implement a router which can switch between various pages
- we will use useContext instead of the loading functionality of React Router 6.4
- note that you can also use the data loading features of React Router 6.4 to load data
- but useContext is a more standard React implementation of a centralized state store for a React application
- these will be our pages
- Welcome - general info about the site
- Tech - will show the tech flashcards loaded from JavaScript object
- German Nouns - will show german noun flashcards loaded from async API (implemented in a future step)
- install React Router
npm i react-router-dom
- in main.tsx we will set up the simplest example of createBrowserRouter, and then expand on it
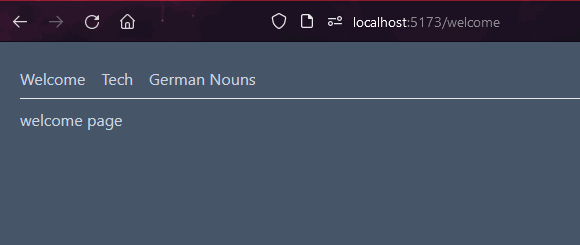
- import ReactDOM from 'react-dom/client';import './index.scss';import { createBrowserRouter, RouterProvider, Outlet, NavLink, Navigate } from 'react-router-dom';const SiteHeader = () => {return (<><header><nav className="flex gap-4"><NavLink to="welcome">Welcome</NavLink><NavLink to="tech">Tech</NavLink><NavLink to="german-nouns">German Nouns</NavLink></nav></header><hr className="mt-2 mb-2" /><Outlet /></>)};const router = createBrowserRouter([{path: "/",element: <SiteHeader />,children: [{path: "/welcome",element: <div>welcome page</div>},{path: "/tech",element: <div>tech page</div>},{path: "/german-nouns",element: <div>German nouns page</div>},{index: true,element: <Navigate to="/welcome" replace />}]}])ReactDOM.createRoot(document.getElementById('root')!).render(<RouterProvider router={router} />)
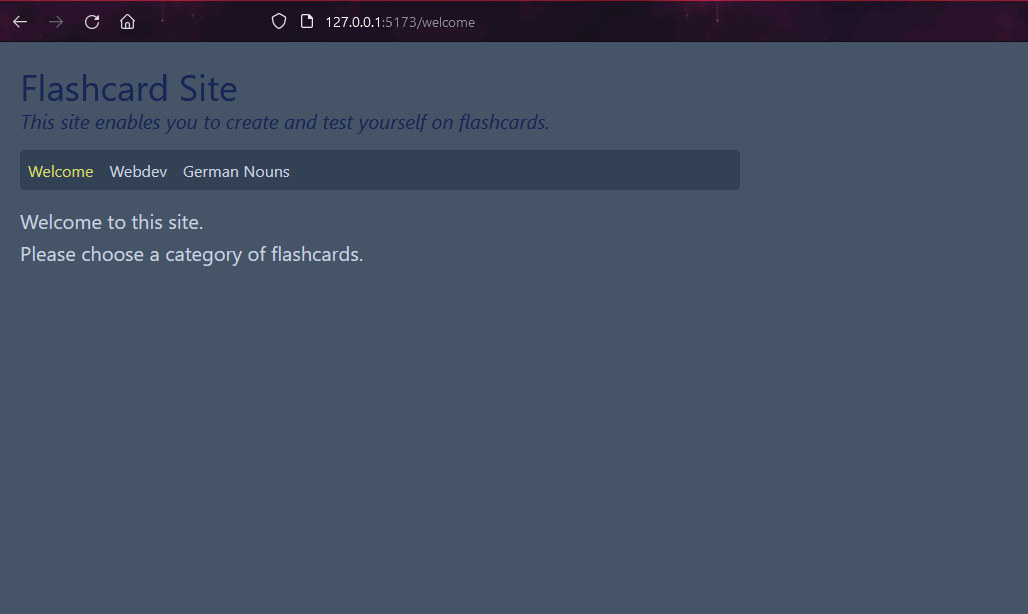
- site should work like this:
- now we will import and load the header and page components
- put SiteHeader in its own component
- components/SiteHeader.tsx
- import { NavLink, Outlet } from "react-router-dom";export const SiteHeader = () => {return (<><header><nav className="flex gap-4"><NavLink to="welcome">Welcome</NavLink><NavLink to="tech">Tech</NavLink><NavLink to="german-nouns">German Nouns</NavLink></nav></header><hr className="mt-2 mb-2" /><Outlet /></>)};
- components/SiteHeader.tsx
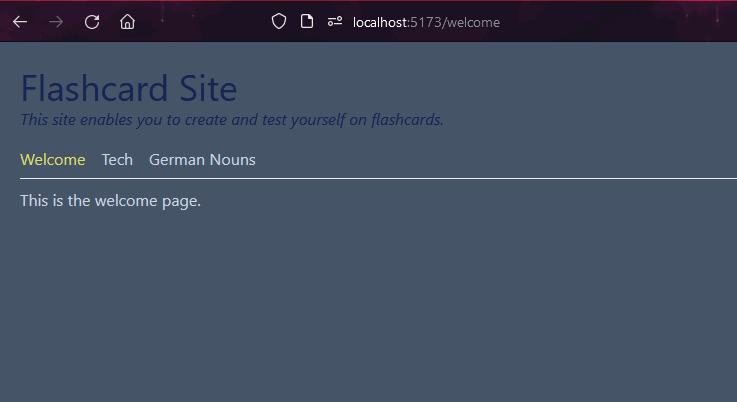
- in /routes, make Welcome Page component, routes/PageWelcome.tsx
- export const PageWelcome = () => {return (<><p>This is the welcome page.</p></>);};
- make other two pages in same way
- main.tsx - load the route components
- const router = createBrowserRouter([{path: "/",element: <SiteHeader />,children: [{path: "/welcome",element: <PageWelcome />},{path: "/tech",element: <PageTech />},{path: "/german-nouns",element: <PageGermanNouns />},{index: true,element: <Navigate to="/welcome" replace />}]}]);
- replace the original layout and data loading from the App.tsx page
- SiteHeader.tsx
- <h1 className="text-orange-400 text-4xl">Flashcard Site</h1><p className="text-orange-300 mb-4">This site enables you to create and test yourself on flashcards.</p>
- now copy over the data loading code for the tech site
- PageTech.tsx
- import { useState, useEffect } from 'react';import axios from 'axios';import { IFlashcard } from '../interfaces';import { FiLoader } from 'react-icons/fi';const backendUrl = import.meta.env.VITE_BACKEND_URL;export const PageTech = () => {const [flashcards, setFlashcards] = useState<IFlashcard[]>([]);useEffect(() => {setTimeout(async () => {const _flashcards = (await axios.get(`${backendUrl}/flashcards`)).data;setFlashcards(_flashcards);}, 1000);}, []);return (<div>{flashcards.length === 0 ? (<FiLoader className="spinner" />) : (<><p className="text-xl">There are {flashcards.length} flashcards.</p>{flashcards.map(flashcard => {return (<div className="bg-slate-900 p-3 mt-3 rounded-md" key={flashcard.id}><div className="text-yellow-200 text-xl">{flashcard.front}</div><div className="font-mono">{flashcard.back}</div></div>)})}</>)}</div>);};
- PageTech.tsx
- SiteHeader.tsx
- problem: the page loads each time one navigates to it##gif

- solution: add useContext which loads the data once when the application loads
- first set up simplest working test version of useContext
- AppContext.tsx
- import { createContext } from 'react';interface IAppContext {testMessage: string;}interface IAppProvider {children: React.ReactNode;}export const AppContext = createContext<IAppContext>({} as IAppContext);export const AppProvider: React.FC<IAppProvider> = ({ children }) => {const testMessage = 'TEST MESSSAGE FROM APPCONTEXT';return (<AppContext.Providervalue={{testMessage}}>{children}</AppContext.Provider>);};
- make AppContext available to every component (provide it to the app with AppProvider)
- main.tsx
- ReactDOM.createRoot(document.getElementById('root')!).render(<AppProvider><RouterProvider router={router} /></AppProvider>)
- main.tsx
- load the test message into the pageTech.tsx page
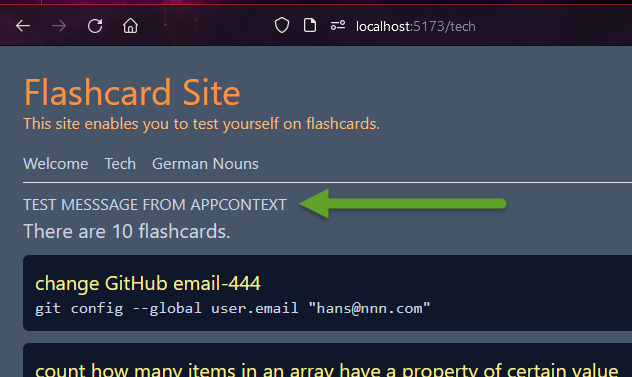
- import { useState, useEffect, useContext } from 'react';const { testMessage } = useContext(AppContext);<h2>{testMessage}</h2>
- tech page should look like this:
- AppContext.tsx
- replace test message with the actual tech flashcards
- AppContext.tsx
- import { createContext } from 'react';import { useState, useEffect } from 'react';import { IFlashcard } from './interfaces';import axios from 'axios';const backendUrl = import.meta.env.VITE_BACKEND_URL;interface IAppContext {flashcards: IFlashcard[];}interface IAppProvider {children: React.ReactNode;}export const AppContext = createContext<IAppContext>({} as IAppContext);export const AppProvider: React.FC<IAppProvider> = ({ children }) => {const [flashcards, setFlashcards] = useState<IFlashcard[]>([]);useEffect(() => {setTimeout(async () => {const _flashcards = (await axios.get(`${backendUrl}/flashcards`)).data;setFlashcards(_flashcards);}, 1000);}, []);return (<AppContext.Providervalue={{flashcards}}>{children}</AppContext.Provider>);};
- PageTech.tsx
- const { flashcards } = useContext(AppContext);
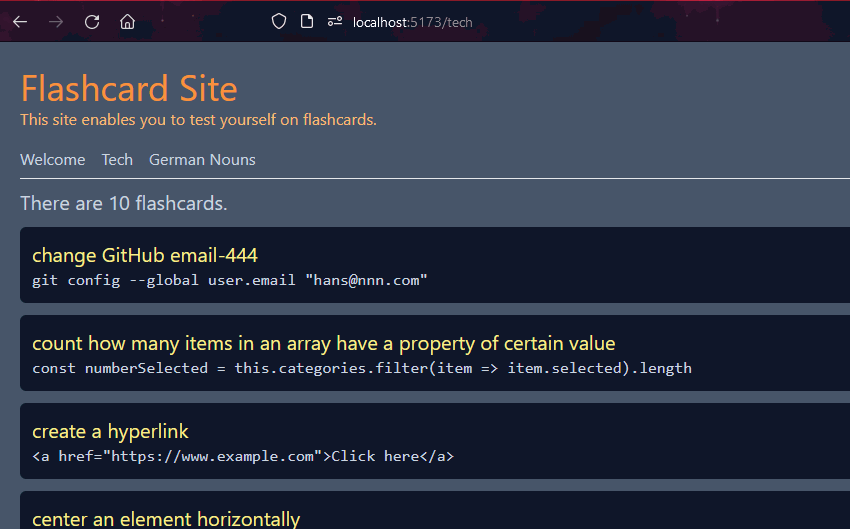
- note that now the flashcards are only loaded once
- and if the user lands on the Welcome page first, the tech flashcards will already have loaded#gif
- and if the user lands on the Welcome page first, the tech flashcards will already have loaded#gif
- AppContext.tsx
- first set up simplest working test version of useContext
- put SiteHeader in its own component
- refactoring and layout improvements
- we have successfully implemented React Router 6.4 and useContext
- data is loading on the Tech page
- we will implement the data loading on the German nouns page in a future step
- data is loading on the Tech page
- we are now going to some do some refactoring and layout improvements
- make active menu item highlighted
- problem: currently the user cannot look at the menu to tell which page is currently displayed
- solution: make the current page highlighted
- SiteHeader.tsx
- import { NavLink, Outlet } from "react-router-dom";export const SiteHeader = () => {const pages = [{title: 'Welcome',idCode: 'welcome'},{title: 'Tech',idCode: 'tech'},{title: 'German Nouns',idCode: 'german-nouns'}]return (<><header><h1 className="text-blue-950 text-4xl">Flashcard Site</h1><p className="text-blue-950 mb-4 italic">This site enables you to create and test yourself on flashcards.</p><nav className="flex gap-4">{pages.map(page => {return (<NavLink to={page.idCode} className={({ isActive }) => isActive ? 'active' : ''}>{page.title}</NavLink>)})}</nav></header><hr className="mt-2 mb-2" /><Outlet /></>)};
- index.scss
- nav a.active {color: rgb(221, 221, 101);}
- active page is now highlighted in menu
- SiteHeader.tsx
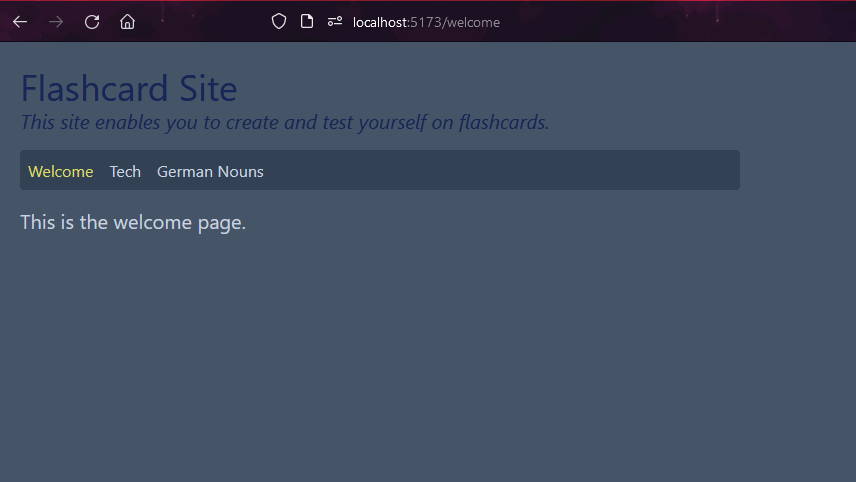
- improve menu layout
- SiteHeader.tsx
- remove the
<hr/>element- <nav className="flex gap-4 bg-slate-700 p-2 rounded w-fit min-w-[45rem] mb-4">
- remove the
- index.scss
- make all text the same size
- @layer components {p {@apply text-xl;}}
- site looks like this:
- SiteHeader.tsx
- refactor page name
- the pages should be called the names of categories of flashcards, e.g. Webdev and German Nouns
- refactor site so that all variables are changed from tech to webdev
- add a 404 page
- if the user types a route that does not exist, they should get an informative 404 page
- Page404.tsx
- import { NavLink } from "react-router-dom"export const Error404 = () => {return (<><h1 className="text-4xl text-blue-950 mb-6">404 Page</h1><p>This page does not exist. Please return to <NavLink to="/welcome" className="text-yellow-200">the site</NavLink>.</p></>)}
- main.tsx - add errorElement
- {path: "/",errorElement: <Error404 />,element: <SiteHeader />,
- add Vercel-React-Router fix
- Vercel has an issue with reloading React Router pages
- the fix is to add this file to the root directory
- vercel.json
- {"rewrites": [{ "source": "/(.*)", "destination": "/" }]}
- vercel.json
- site now looks like this:
- we have successfully implemented React Router 6.4 and useContext
- we now want to implement a router which can switch between various pages
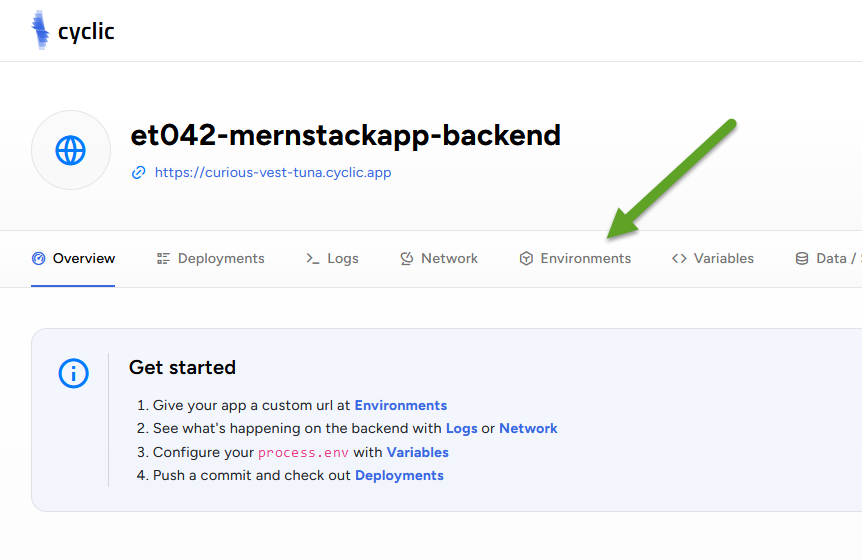
- (10) Publish backend at Cyclic and use Cyclic from frontend instead of Render in order to avoid long spin-up times
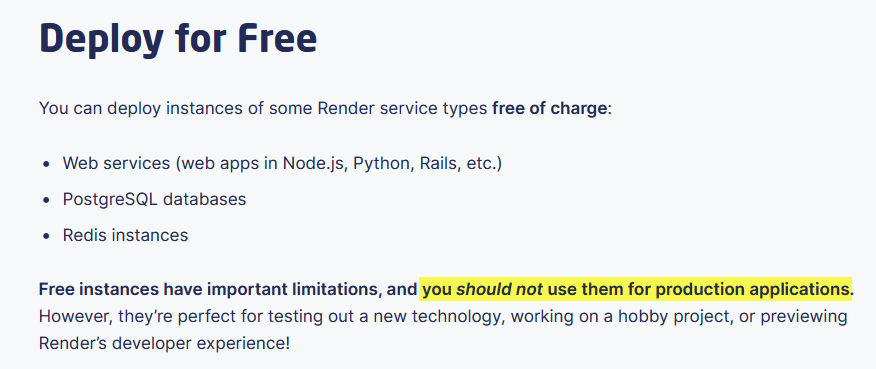
- using the free-tier version of Render for the backend server is useful for learning full-stack but not for public-facing applications
- the reason is that after 15 minutes, it backend is spun down
- this means that the next time a user visits your frontend
- your frontend sends a request to the backend at Render for data
- Render then has to spin up the Node instance
- while the Render documentation says this takes a few seconds
- my research has shown that it can take anywhere from 19 to 55 seconds
- Render even states in their documentation, that free instances are not recommended for production use
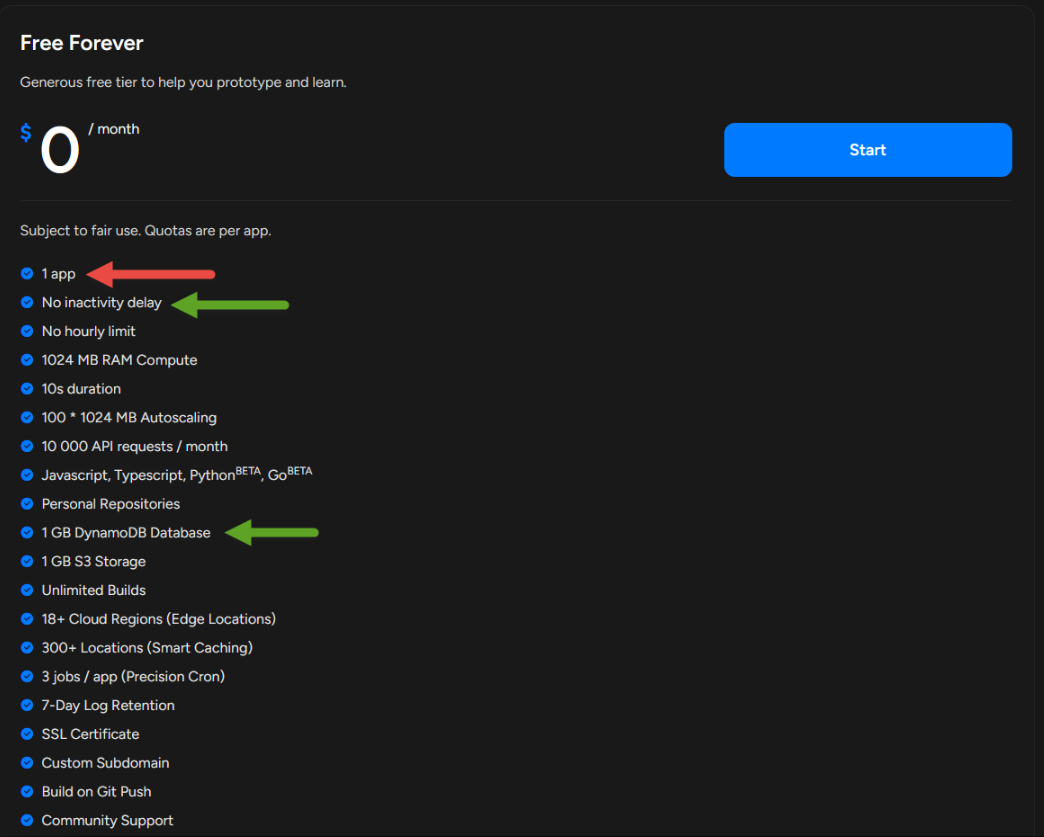
- therefore we will try a new service for our backend called Cyclic
- while this service has no inactive delay as Render has
- you are only allowed to have 1 app on the free tier
- since at Render you can have unlimited apps (limited only by usage of hours)
- Render is a good platform for learning and experimenting with numerous test backends
- while Cyclic is good backend service that is consistently fast, responsive and can be used to serve data to a public-facing frontend
- get account at Cyclic
- go to: ../cyclic.shhttps://cyclic.sh
- sign up with your GitHub account
- publish your app
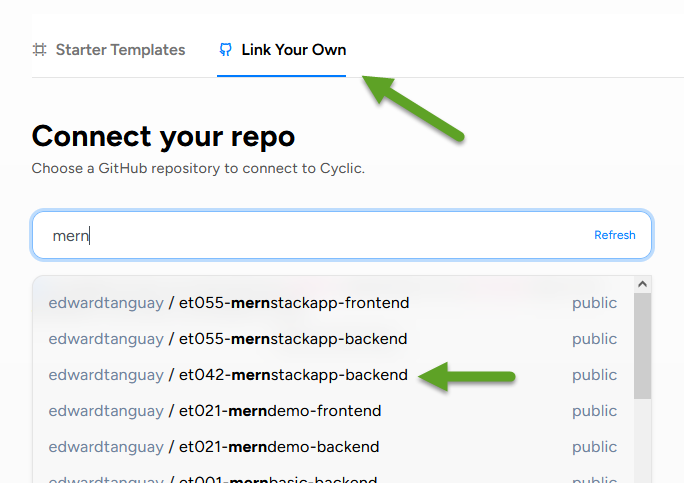
- click Link Your Own and search for the repository you want to publish
- (we can leave all advanced settings as their defaults)
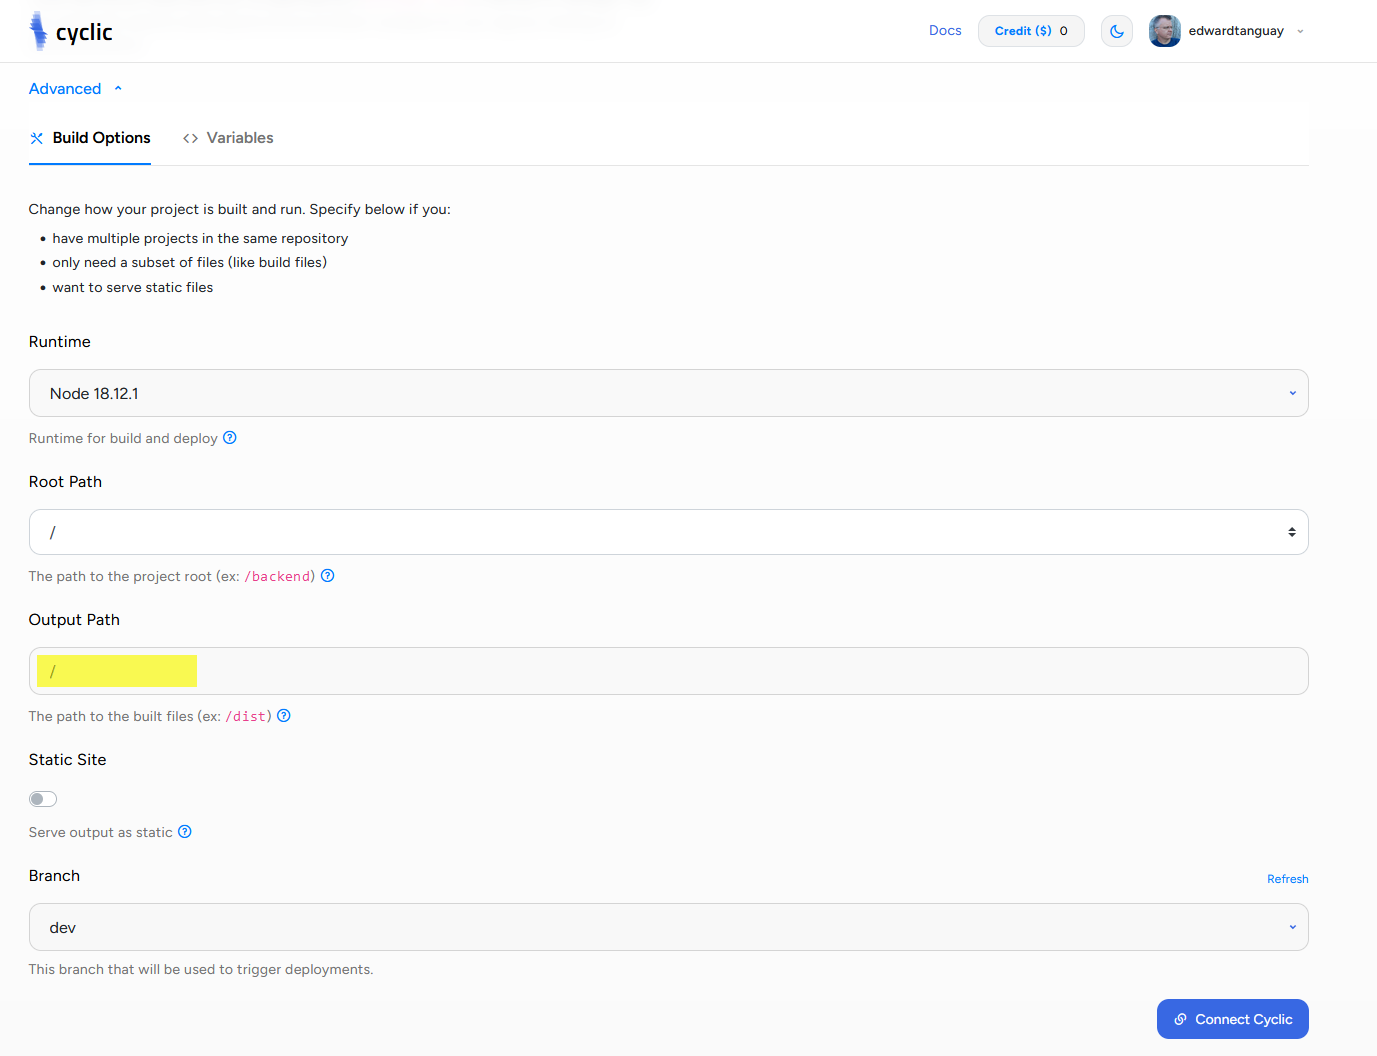
- just click the button Connect Cyclic
- your app should be live within about 20 seconds
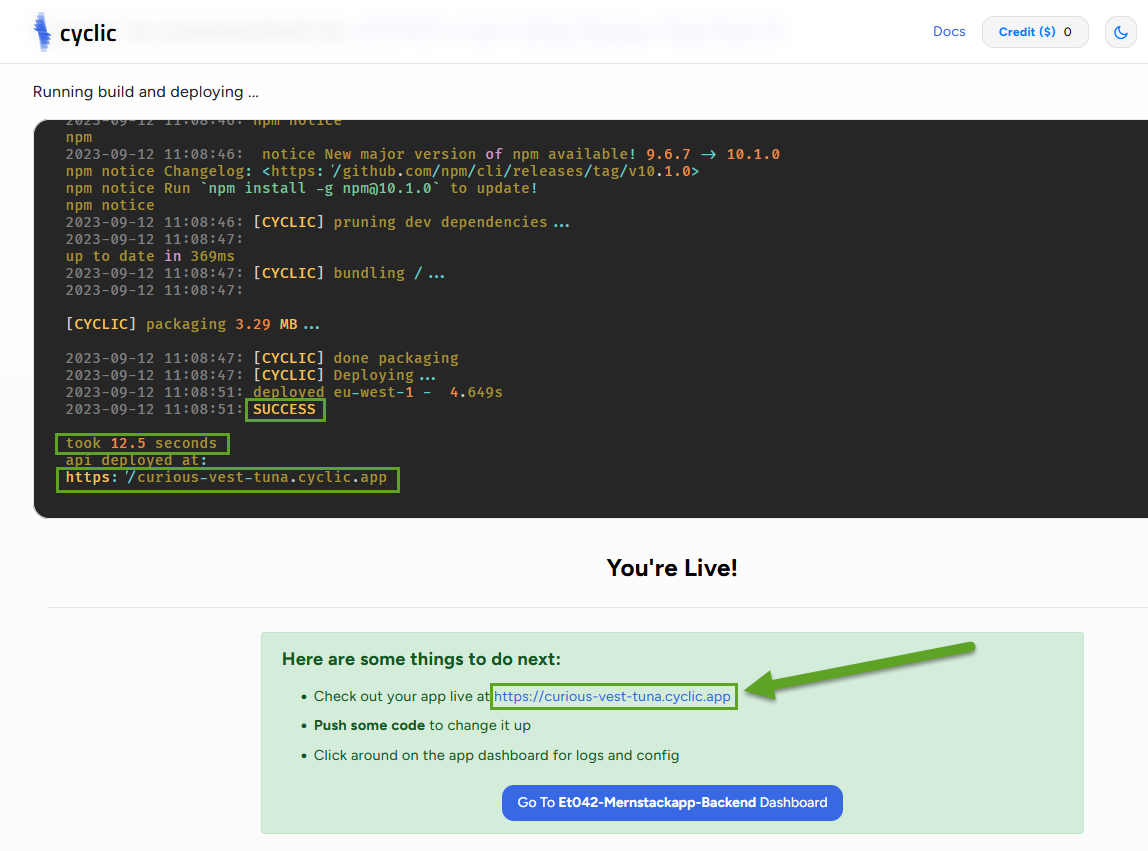
- click on the link and you will see your backend
- change the random URL name to the name of your directory: et042-mernstackapp-backend
- click Cyclic
- then click on the settings icon of your app:

- click Environments
- enter your project name and click Save Changes
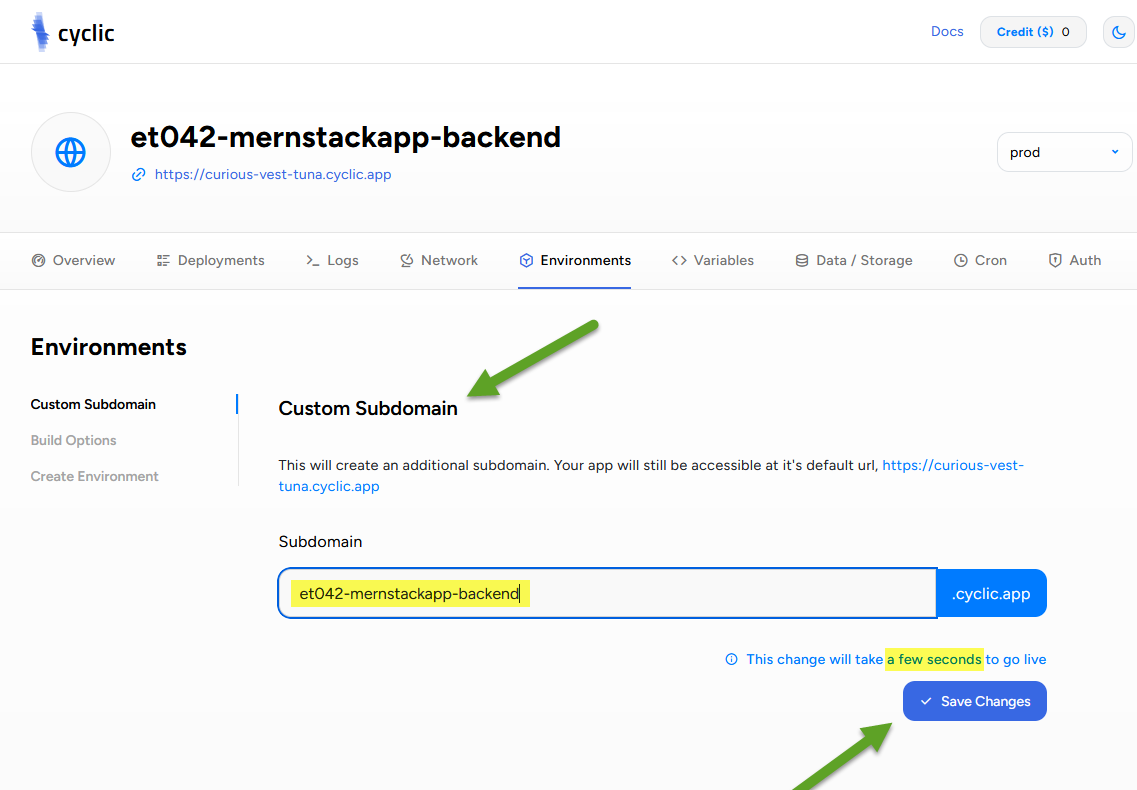
- click on the new link and you will see your backend under your new URL
- click Link Your Own and search for the repository you want to publish
- now change your frontend so that it reads the Cyclic backend instead of the Render backend
- go to Vercel
- click on your frontend app
- click Settings and Environment Variables
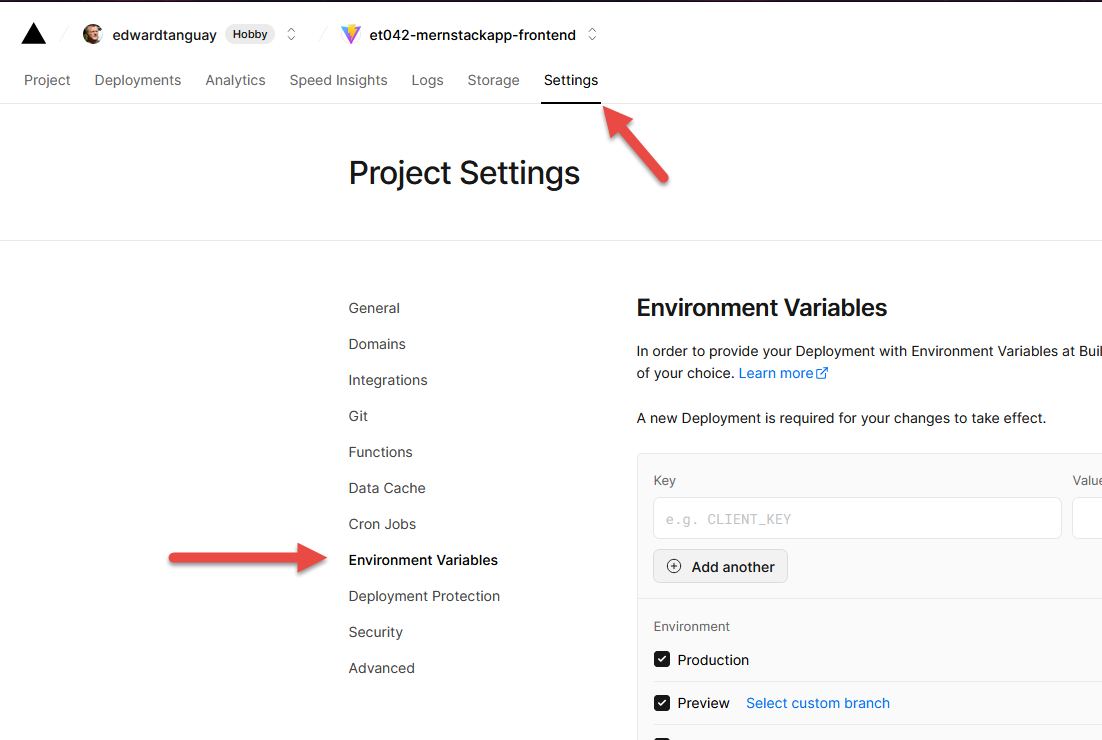
- edit your backend URL variable
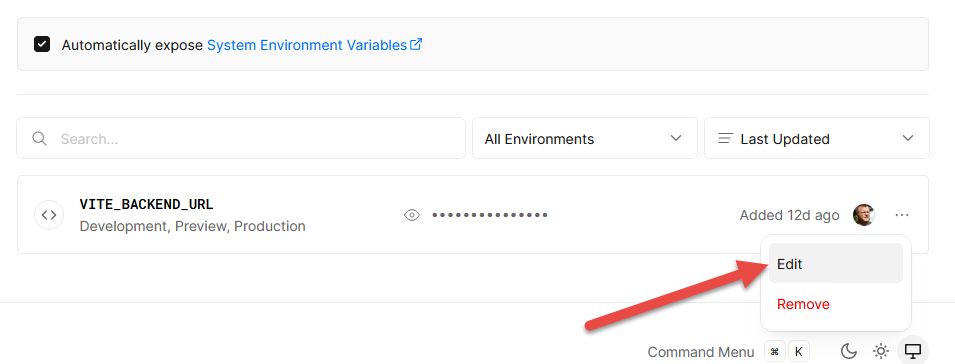
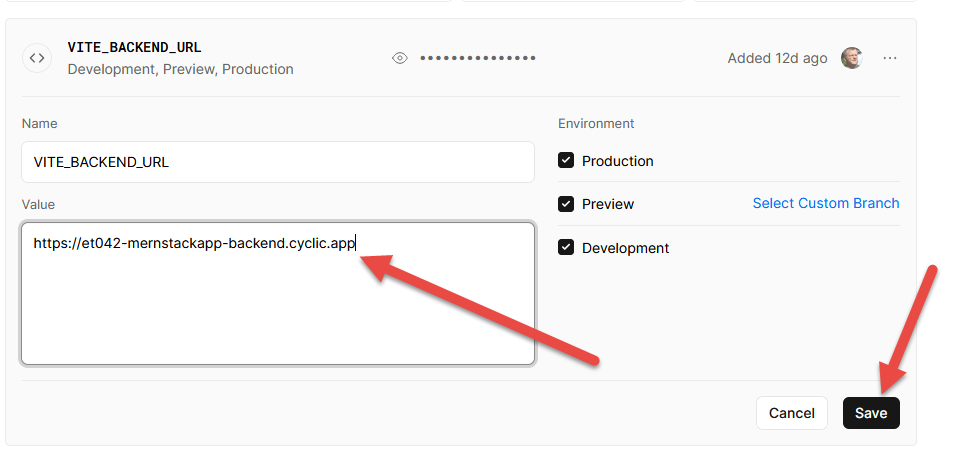
- replace the Render URL with the Cyclic URL and click Save
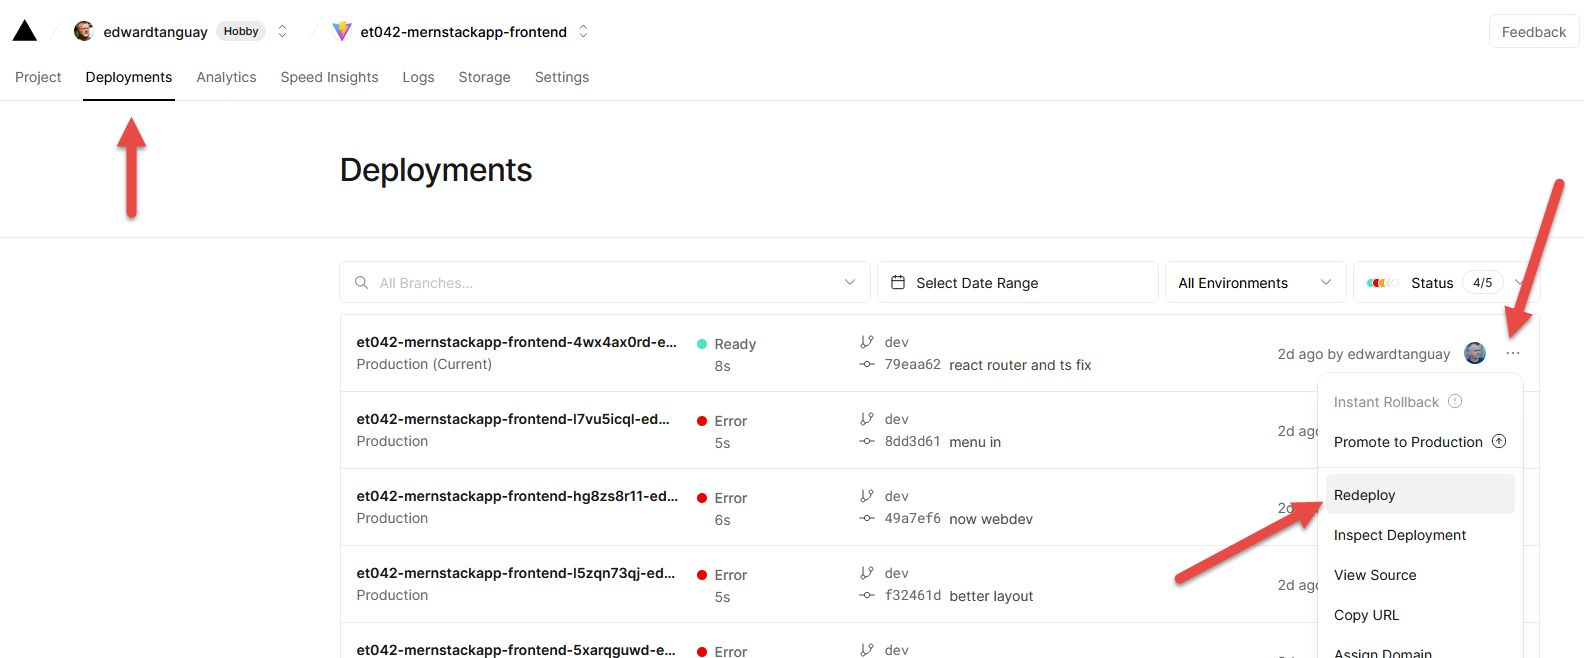
- in order for the change of environmental variable to take place, you have to redepoy the app
- click Deployments, edit the last deployment, and choose Redploy
- the site should load immediately, but with the mock one second wait
- let's take that mock wait out now:
- push and publish to Vercel
- the online frontend now loads and displays the data from the backend immediately
- but since it takes a half second, there is splite second where you see the flicker of the spinner:
- but since it takes a half second, there is splite second where you see the flicker of the spinner:
- remove this flicker with a CSS animation that fades the screen in on page load
- index.css
- body {animation: fadein .5s ease-in;}@keyframes fadein {from {opacity: 0;}to {opacity: 1;}}
- I had a white flash in Firefox on page load, the solution was to add a background color of the same site color in index.html
- <style>body {background-color: #475569;}</style>
- index.css
- push and publish to Vercel
- look at the online site, you should see a fade-in instead of a flicker:

- using the free-tier version of Render for the backend server is useful for learning full-stack but not for public-facing applications
- (11) Refactor webdev flashcards into components and make interactive (open/close)
- DOING...
- NEXT STEPS...
- (12) In backend create /germannouns route which fetchs data from API and display on frontend
- (EXTRA) Create starter site: Full-stack application for read-only data using React-Vercel and Node-Express-Render
- (FORAY): Research and set up best-practice Node/Express/Mongo/Mongoose API with routes, controllers, models, error handling and testing
- (13) In backend, fetch data from MongoDB Atlas database
- currently the data in the backend is coming from a JavaScript object
- we will set up a MongoDB Atlas database
- copy this data into a collection in that database
- then from the backend, connect to the MongoDB Atlas database and read in data and pass it to the API route
- log into MongoDB Atlas: ../www.mongodb.comhttps://www.mongodb.com
- click on Browse Collections